Quick Test implementation is in quick-test branch Firmware implementation is in non-experimental-firmware branch
This main branch will now act as the production branch for both repositories. So now the standard operating procedure is that if you need to just test the most up to date firmware and GUI on the F0 use the main branch for both. In the future, if we need to add a feature that will go into production, you will create a feature branch from the main branch and merge the feature back into main when the feature is complete (and you have ensured that this doesn't break the production branch). The process I️ follow for this, in order to not break production, is to:
i). have the most up to date main branch and your feature branch ii). create a branch off of main called (merge-featureX-to-main) iii). git merge your feature branch into merge-featureX-to-main iv). resolve any merge conflicts v). git merge merge-featureX-to-main into the production branch (once you have resolved any issues) vi). finally push your local main branch changes to the remote main branch
- 0x5B ------- Exit Stop Mode
- 0x0C ------- Enter Stop Mode
- 0x0B ------- Toggle PF6 (SDN1) High
- 0x0A ------- Toggle PF6 Low
- 0x08 ------- Toggle PF7 (SDN2) High
- 0x09 ------- Toggle PF7 Low
- 0x1B ------- ERPA Step Up
- 0x1C ------- ERPA Step Down
- 0x00 ------- Toggle PB5 (sys_on) High
- 0x13 ------- Toggle PB5 Low
- 0x01 ------- Toggle PB6 (800v_en) High
- 0x14 ------- Toggle PB6 Low
- 0x02 ------- Toggle PC10 (3v3_en) High
- 0x15 ------- Toggle PC10 Low
- 0x03 ------- Toggle PC13 (n150v_en) High
- 0x16 ------- Toggle PC13 Low
- 0x04 ------- Toggle PC7 (15v_en) High
- 0x17 ------- Toggle PC7 Low
- 0x05 ------- Toggle PC8 (n5v_en) High
- 0x18 ------- Toggle PC8 Low
- 0x06 ------- Toggle PC9 (5v_en) High
- 0x19 ------- Toggle PC9 Low
- 0x07 ------- Toggle PC6 (n3v3_en) High
- 0x1A ------- Toggle PC6 Low
- 0x0D ------- Turn on PMT Packet
- 0x10 ------- Turn off PMT Packet
- 0x0E ------- Turn on ERPA Packet
- 0x11 ------- Turn off ERPA Packet
- 0x0F ------- Turn on HK Packet
- 0x12 ------- Turn off HK Packet
- Connect an STM32F051 to your machine with a USB cable. Also plug in a UART cable to your machine.
- Plug the yellow cable (RX) from UART to PA9. Plug the orange cable (TX) from UART to PA10. Plug in the black cable (ground) to GND. The ADCs are tied to the STM32 as followed:
- PA0 = ADC_IN0, END_mon: entrance/collimator monitor
- PA1 = ADC_IN1, BUS_Vmon: instrument bus voltage monitor
- PA2 = ADC_IN2, BUS_Imon: instrument bus current monitor
- PA3 = ADC_IN3, 5vref_mon: Accurate 5V for ADC monitor
- PB0 = ADC_IN8, TMP 1: Sweep temperature
- PB1 = ADC_IN9, TMP 2: feedbacks
- PA7 = ADC_IN7, SWP_mon: Sweep voltage monitor
- PC0 = ADC_IN10, 2v5_mon: power monitor
- PC1 = ADC_IN11, 3v3_mon: power monitor
- PC2 = ADC_IN12, 5v_mon: power monitor
- PC3 = ADC_IN13, n3v3_mon: power monitor
- PC4 = ADC_IN14, n5v_mon: power monitor
- PC5 = ADC_IN15, 15v_mon: power monitor
- temp: (internally connected) = ADC_IN16, VSENSE
- Vref: (internally connected) = ADC_IN17, VREFINT
- Clone the repository using
git clone https://github.com/3UCubed/Instrument-Software.git - Open "Firmware" with the STM32CubeIDE, and run main.c.
- In Terminal, navigate to "Packet-Interpreter".
- Use
rm screenlog.0to remove screenlog.0, so a new one can replace it. - Use
screen -L /dev/cu.usbserial-FT61T5FW 115200to populate screenlog.0. If you would like to put it in Stop Mode, type "s" in the terminal. To then wake it, type "£" in the terminal. - Let it run for a few seconds, and use "control" + "a" + "\" to exit.
- Use
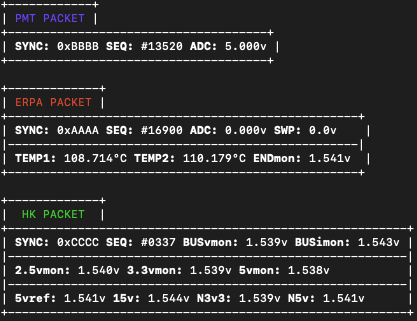
makeand then./interpreter screenlog.0to see the outputted packets.
The output should appear like this: