DISCO stands for DIStributed COmputing. It provides the user with the ability to deploy a distributed computing cluster in as short a time as imaginable. Not only will it setup the whole virtual computing cluster but it will also install the desired distributed computing frameworks on it. Then, it will guide you through the entire lifecycle of the cluster until its disposal, which is also maintained by DISCO. You will be amazed by how much work DISCO is taking care of - and how intuitively it handles your requests.
In the following section, I will explain how to configure and use the server part of DISCO, taking care of the user requests and forwarding the required commands to the cloud computing software. Keep in mind: the description here was written on an Ubuntu system and the commands might be different on your system if you are not using Ubuntu.
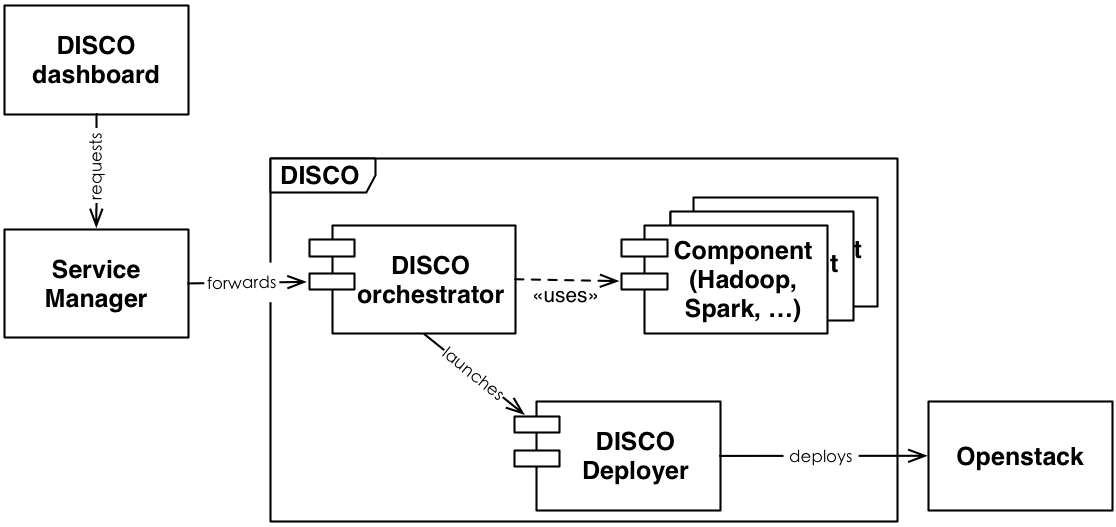
DISCO is an orchestration system to create distributed computing clusters. How this is done you ask? The answer is: over Heat templates. These templates will determine the lifecycle of computing clusters, installed on the cloud computing managing software OpenStack.
Provisioning a cluster is done in a few easy steps:
- deploying the DISCO backend on a dedicated machine which can be done on the same OpenStack system as the cluster is to be hosted on or on a different one - it can even be deployed on a dedicated physical computer or on localhost (for testing)
- deploying the DISCO dashboard which presents an easy-to-use web interface to you, the end user, for creating new virtual clusters and handling its usage over its entire lifetime.
For the detailed configuration and example commands, please refer to the following section.
The most basic requirement is an OpenStack installation with access to the necessary resources for the clusters. Also, you need to expose the OpenStack endpoints to DISCO. These are actually just the regular endpoints so no complication in this part. You can find them on Horizon (OpenStack's web interface) -> Compute -> Access & Security -> API Access.
But before we get to that point, let's install DISCO backend. This short guide will give you the relevant commands for this.
-
A few prerequisites have to be present before DISCO can run. Let's install those:
sudo apt-get update sudo apt-get install -y git python-pip libffi-dev libcurl4-openssl-dev python-dev python-lxml -
Now, an SDK has to be installed which provides DISCO with some important commands. In order to install this SDK, some packages might have to be upgraded:
sudo pip install --upgrade <package name> -
Let's install the SDK now:
cd
git clone https://github.com/icclab/hurtle_cc_sdk.git
cd hurtle_cc_sdk
sudo python setup.py install
4. At this point, DISCO can be installed.
```
cd
git clone https://github.com/icclab/disco.git
cd disco
sudo python setup.py install
```
-
Before you can start DISCO, you need to make a couple of changes in the sm.cfg configuration file within the etc subdirectory of DISCO. These values are:
- manifest: the path to the file service_manifest.json which is in the sm/managers/data subfolder of DISCO but could be at any other location.
- design_uri: Keystone's public endpoint in OpenStack. (listed as "Identity")
- framework_directory: the path of the directory under ./sm/managers/data which is containing all the components that can be installed through DISCO.
-
As soon as these changes are made, you can start DISCO with the command
service_manager -c /path/to/sm.cfgAt this point, DISCO is running and you can issue the HTTP commands to create a cluster.
In order to have a distributed computing cluster set up, you will need to issue a couple of HTTP commands. So let's have a look at those. Additionally, you will need a SSH public key registered within OpenStack which you can login with later on the cluster's master.
-
You can list all the available services of a specific DISCO SM with the command
curl -v -X GET http://<DISCO IP>:8888/-/ \
-H 'Accept: text/occi' \
-H "X-Tenant-Name: $OS_TENANT_NAME" \
-H "X-Auth-Token: $TOKEN"
The three variables $OS_USERNAME, $OS_PASSWORD and $OS_TENANT_NAME are the same that you can download within the openrc.sh file from OpenStack. How that is done? Just go back to Horizon -> Compute -> Access & Security -> API Access. Here, you can download this access file.
But now back to the command from before: it will list all the registered services with the possible parametrs. For DISCO, this is the service "disco".
-
With the following command, a cluster can be created:
curl -v -X POST http://<DISCO IP>:8888/disco/ \
-H 'Category: disco; scheme="http://schemas.cloudcomplab.ch/occi/sm#"; class="kind";' \
-H 'Content-type: text/occi' \
-H 'X-Tenant-Name: $OS_TENANT_NAME' \
-H 'X-Region-Name: $OS_REGION_NAME' \
-H 'X-User-Name: $OS_USERNAME' \
-H 'X-Password: $OS_PASSWORD' \
-H "X-Auth-Token: $TOKEN" \
-H 'X-OCCI-Attribute: '\
   'icclab.disco.components.heat.networkname="<name of the network to be created for the cluster>",'\
   'icclab.disco.components.heat.externalnetworkname="<name of the external network>",'\
   'icclab.disco.components.heat.masterimage="<ID of master image>",'\
   'icclab.disco.components.heat.slaveimage="<ID of slave image>",'\
   'icclab.disco.components.heat.masterflavor="<ID of master's flavor>",'\
   'icclab.disco.components.heat.slaveflavor="<ID of slave's flavor>",'\
   'icclab.disco.components.heat.slavecount="<amount of slaves to be deployed>",'\
   'icclab.disco.deployer.username="$OS_USERNAME",'\
   'icclab.disco.deployer.password="$OS_PASSWORD",'\
   'icclab.disco.deployer.region="$OS_REGION_NAME",'\
   'icclab.disco.dependencies.inject="<components to deploy as a Python dictionary>"'
There is one very long header, X-OCCI-Attribute, which contains all the parameters for the cluster setup. Each parameter starts with the string "icclab.disco.". A short description of each parameter is provided in the command above. A more extensive description can be found in the wiki.
A successful deployment will be acknowledged with an 'OK' and a UUID which identifies the created cluster within DISCO. It is within the location field of the response. Remember this because it is the address which you will send the following requests to.
-
However, if you haven't taken note of the UUID, you can still retrieve it with the command
curl -v -X GET http://<DISCO IP>:8888/disco/ \
-H 'Accept: text/occi' \
-H "X-Tenant-Name: $OS_TENANT_NAME" \
-H "X-Auth-Token: $TOKEN"
This will list all clusters which have been deployed for the given username / tenant on the given DISCO instance.
-
If you want to know the IP of your newly created cluster, issue the following HTTP command:
curl -v -X GET http://<DISCO IP>:8888/disco/$UUID \
-H 'Accept: text/occi' \
-H "X-Tenant-Name: $OS_TENANT_NAME" \
-H "X-Auth-Token: $TOKEN"
Note: if the cluster hasn't been fully created by OpenStack yet, this command will return an error. Just try it again after a short time.
Note 2: Don't forget to replace the UUID field with the actual ID returned by DISCO in the command before.
As soon as the cluster creation has been finished on OpenStack's side, this command will return the IP address of the cluster's master node. It is in the 'external_ip' field. You will notice a few more output values among the given parameters. These are the following:
ssh_key_name - this is the name of the newly created SSH keypair which will serve you as access key if you want to connect to the master node over SSH; the name is actually a redundant information, but for completeness' sake, it has been provided ssh_public_key - this is the SSH public key of the keypair which has been created; neither this is of importance for you, but again, it has been provided for completeness' purposes ssh_private_key - this is the important information: with the private key, you'll be able to connect to the master node over SSH!
-
As soon as you have the IP of the master node, you can login over SSH:
ssh -i path/you/the/created/private.key ubuntu@external_ipBecause the deployment on OpenStack is just a part of the cluster provisioning, your cluster most likely isn't ready yet for big data processing - the actual software has to be installed. (Which of course is being done automatically) But as soon as you have logged in, you can check the deployment status:
tail -f /home/ubuntu/webserver/deployment.logAs soon as the deployment has finished, it will tell so within the deployment.log file.
You can actually access the whole logging status directory over a webserver on port 8084. (http://external_ip:8084) Here, you have even more information such as the entire terminal output during the deployment.
-
If you would like to delete the cluster again, the following command will help you
curl -v -X DELETE http://<DISCO IP>:8888/disco/$UUID \ -H 'Category: disco; scheme="http://schemas.cloudcomplab.ch/occi/sm#"; class="kind";' \ -H 'Content-type: text/occi' \ -H 'X-Tenant-Name: $OS_TENANT_NAME' \ -H "X-Auth-Token: $TOKEN" -
After this last step, you can check with the command at a previous step that the cluster is not registered within DISCO anymore and the resources are freed. You can also double check that information on OpenStack Horizon. (Orchestration -> Stacks)
Comprehensive API reference and developer's guides, as well as troubleshooting pages are available in the Wiki section.
- Email: icclab-disco[at]dornbirn[dot]zhaw[dot]ch
- Website: icclab.github.io/disco
- Blog: http://blog.zhaw.ch/icclab
- Tweet us @DISCO_framework
  Licensed under the Apache License, Version 2.0 (the "License"); you may
  not use this file except in compliance with the License. You may obtain
  a copy of the License at

       http://www.apache.org/licenses/LICENSE-2.0

  Unless required by applicable law or agreed to in writing, software
  distributed under the License is distributed on an "AS IS" BASIS, WITHOUT
  WARRANTIES OR CONDITIONS OF ANY KIND, either express or implied. See the
  License for the specific language governing permissions and limitations
  under the License.