Cloud Computing Class of DTE FTUI - 2024/2025
Group 11:
- Annisa Ardelia Setiawan (2206059471)
- Muhammad Farrel Mirawan (2106731554)
- Andikha Wisanggeni (2106731503)
- Yehezkiel Jonatan (2006520235)
Instructor: Yan Maraden
Note: in our examples, every password is the same as the username. This is not best practice at all. Please use strong passwords, especially in production environments.
- Introduction
- Environment Setup
- Installing Ubuntu Server 25.04
- Network Configuration
- CloudStack Installation
- Launch Management Server
- Installing Instances
- CentOS Instance Fun Stuff

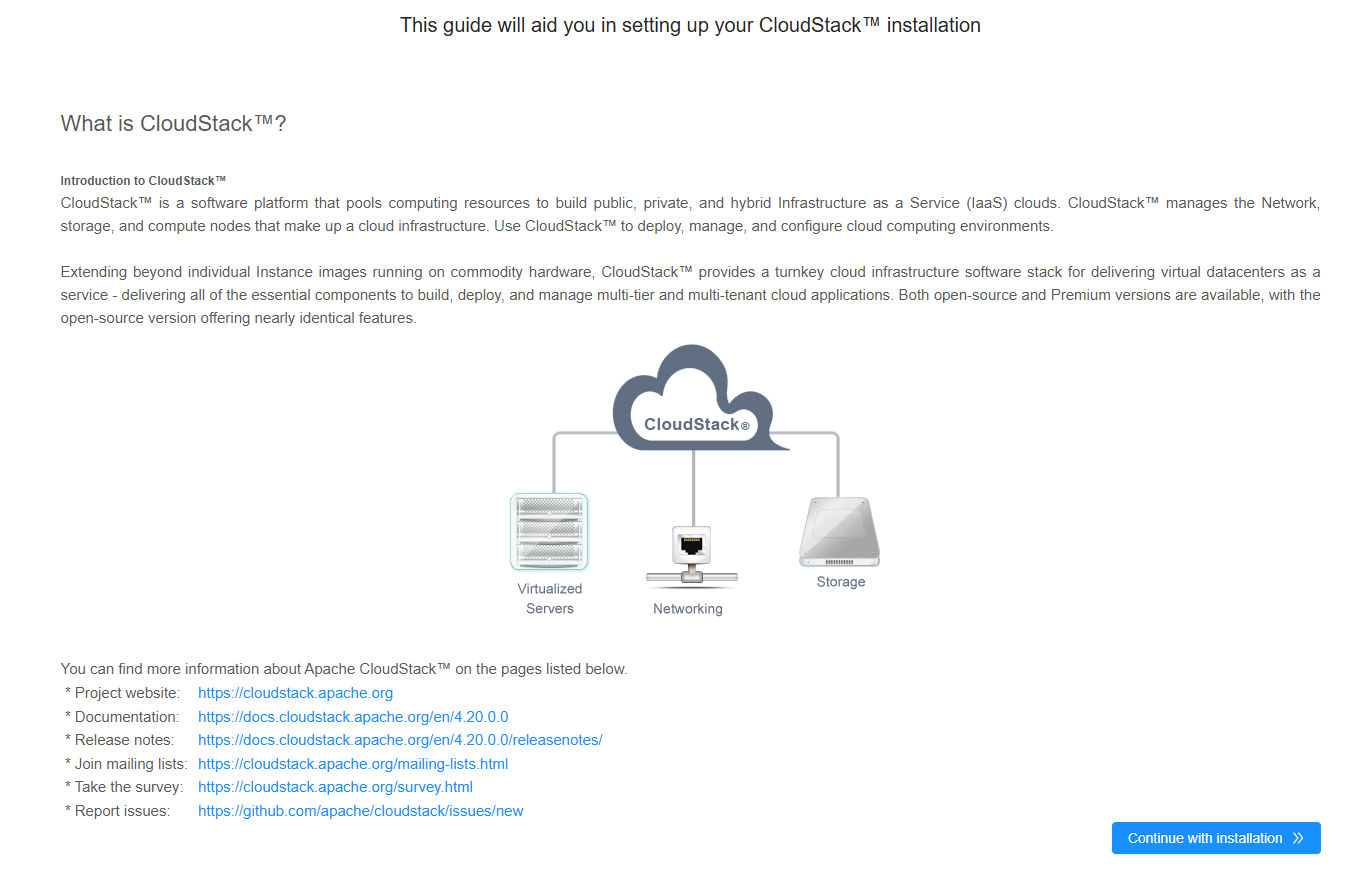
Apache CloudStack is open-source software designed to deploy and manage large networks of virtual machines, as a highly available, highly scalable Infrastructure as a Service (laaS) cloud computing platform. It manages pools of compute, storage, and network resources, providing an on-demand, elastic cloud computing service. Essentially, it turns existing virtual infrastructure into a cloud-based IaaS platform. CloudStack is used by a number of service providers to offer public cloud services, and by many companies to provide an on-premises (private) cloud offering, or as part of a hybrid cloud solution.

- Management Server: The central orchestrator that handles resource allocation, VM provisioning, and overall cloud operations.
- Hypervisor Hosts: The compute layer where virtual machines run, supporting hypervisors like KVM, VMware, and XenServer.
- Primary Storage: Direct storage for virtual machines, ensuring fast access to disk resources.
- Secondary Storage: Stores templates, ISO images, and VM snapshots, shared across multiple zones.
- CloudStack UI/API: The interface for users and administrators to interact with the cloud, offering both a web-based UI and RESTful API.
We used a Dell Latitude 3500 laptop for Cloudstack management and agent provided by our instructor, Yan Maraden.
| Component | Specification |
|---|---|
| CPU | Intel Core i5 (8th Gen) |
| RAM | 24 GB |
| Storage | 250 GB SSD |
| Network | Ethernet 100 Gb/s |
| OS | Ubuntu Server 25.04 |
| Configuration | Value |
|---|---|
| Network | 192.168.1.0/24 |
| Host IP | 192.168.1.11 |
| Gateway | 192.168.1.1 |
| Management IP | 192.168.1.11 |
| Public IP | 192.168.1.201 - 192.168.1.210 |
| System IP | 192.168.1.211 - 192.168.1.220 |
- We used a flash drive to install Ubuntu Server.
- Create a bootable drive of Ubuntu Server onto the flash drive.
- Boot into it.
- On the GRUB menu, click Try or Install Ubuntu Server
Language: default English

Keyboard layout: default English (US)

The type of installation: default Ubuntu Server, not Ubuntu Server (minimized). And choose Search for third-party drivers.

Network configuration for internet connection: We used a wired connection.
DHCPv4 192.168.1.3/24

We used no proxies, we left it blank.

We used the default mirror address.
http://id.archive.ubuntu.com/ubuntu/
Make sure the mirror location passes the connectivity test.

In guided storage configuration. We used the entire disk and set it up as an LVM group (default). We used no encryption (LUKS).

We extended the ubuntu-lv to take up the entire space of the ubuntu-vg, because it defaults to 100G while there's 235.421G of total space on the disk. We leave everything else as default. Confirm destructive action.


Enter your username and password.

We choose to install the OpenSSH server package so that we don't need to install it later.

We have no applicable third-party drivers available, but choose to install them if you have.

We skip all of them.

 After it's done: click Reboot now, remove the installation medium, then press ENTER.


Login using the username and password.

DONE! Server is now ready for SSH access.
We use PuTTY to do SSH.

Sources:
- https://www.youtube.com/watch?v=DlJg3LYvIIs
- https://www.youtube.com/watch?v=mvuSBFGSYWI&list=PLW7vgBNPiQhmvj6dnS5ss3IdTqHCqvknm
There's a file in /etc/netplan/50-cloud-init.yaml.
cd /etc/netplan
sudo nano ./50-cloud-init.yaml

Edit that file into this (change the network address into your host IP address and the network interface aswell):
# This is the network config written by 'subiquity'
network:
  version: 2
  renderer: networkd
  ethernets:
    enp1s0:
      dhcp4: false
      dhcp6: false
      optional: true
  bridges:
    cloudbr0:
      addresses: [192.168.1.11/24]  # Your host IP address
      routes:
        - to: default
          via: 192.168.1.1
      nameservers:
        addresses: [1.1.1.1,8.8.8.8]
      interfaces: [enp1s0]
      dhcp4: false
      dhcp6: false
      parameters:
        stp: false
        forward-delay: 0
Apply the network configuration (if you change the network address, this will disconnect your SSH session and you would have to reconnect back using the new network address):
sudo netplan generate #generate config file for the renderer
sudo netplan apply  #applies network configuration to the system
sudo reboot #reboot the system
sudo netplan generate: Creates a network configuration file for the specified renderer.sudo netplan apply: Applies the generated network configuration to the system.sudo reboot: Restarts the system to ensure the applied network settings take effect.
Check ifconfig to make sure there's a network bridge called cloudbr0:
cloudbr0: flags=4163<UP,BROADCAST,RUNNING,MULTICAST>  mtu 1500
        inet 192.168.1.11  netmask 255.255.255.0  broadcast 192.168.1.255
        inet6 fe80::d872:c1ff:fee0:d312  prefixlen 64  scopeid 0x20<link>
        ether da:72:c1:e0:d3:12  txqueuelen 1000  (Ethernet)
        RX packets 325  bytes 28333 (28.3 KB)
        RX errors 0  dropped 32  overruns 0  frame 0
        TX packets 95  bytes 12881 (12.8 KB)
        TX errors 0  dropped 2 overruns 0  carrier 0  collisions 0

enp1s0: flags=4163<UP,BROADCAST,RUNNING,MULTICAST>  mtu 1500
        ether a4:bb:6d:15:3c:72  txqueuelen 1000  (Ethernet)
        RX packets 357  bytes 37263 (37.2 KB)
        RX errors 0  dropped 0  overruns 0  frame 0
        TX packets 95  bytes 12881 (12.8 KB)
        TX errors 0  dropped 0 overruns 0  carrier 0  collisions 0

lo: flags=73<UP,LOOPBACK,RUNNING>  mtu 65536
        inet 127.0.0.1  netmask 255.0.0.0
        inet6 ::1  prefixlen 128  scopeid 0x10<host>
        loop  txqueuelen 1000  (Local Loopback)
        RX packets 84  bytes 6352 (6.3 KB)
        RX errors 0  dropped 0  overruns 0  frame 0
        TX packets 84  bytes 6352 (6.3 KB)
        TX errors 0  dropped 0 overruns 0  carrier 0  collisions 0
 And make sure you have internet connectivity.
Installing Hardware resource monitoring tools
sudo apt install htop lynx duf bridge-utilshtopis CPU usage monitoring tooldufis Disk usage monitoring toollynxis CLI based web browser
sudo apt install openntpd openssh-server sudo vim tar intel-microcodeopenntpdis NTP client to synchronize time between host and entire internetopenssh-serveris an SSH server to enable remote accessvimis a text editortaris a tool to compress and decompress file. Tar is used to decompress most of the downloaded fileintel-microcodeis a set of procedures written in x86 assembly to increase low level modularity
We need our server's clock to be in sync by using NTP. Use timedatectl to make sure that the time and the timezone is correct.
timedatectl set-timezone Asia/Jakarta
Scroll until you found your country time zone.

Ubuntu disables root password by default, so we have to make a root password to be able to login as root.
sudo passwd root
Permit SSH root login by editing the file /etc/ssh/sshd_config and restarting the ssh service.
sudo nano /etc/ssh/sshd_configFind the line 'PermitRootLogin' make sure it set to 'yes'

Then restart the ssh service.
service ssh restartThe Controller and Compute Node is on the same host. We import cloudstack repositories key:
mkdir -p /etc/apt/keyrings
wget -O- http://packages.shapeblue.com/release.asc | gpg --dearmor | sudo tee /etc/apt/keyrings/cloudstack.gpg > /dev/null
sudo su
echo deb [signed-by=/etc/apt/keyrings/cloudstack.gpg] http://packages.shapeblue.com/cloudstack/upstream/debian/4.20 / > /etc/apt/sources.list.d/cloudstack.list- The first step involves creating a directory to store the CloudStack public key.
- The
wget -Ocommand is used to download the specified URL and pass the output togpg --dearmor, which converts the ASCII-armored key into its binary format. - The
sudo teecommand redirects the output of to file, ensuring the key is properly stored for package authentication.
Open the cloudstack list.
sudo nano /etc/apt/sources.list.d/cloudstack.list

We use the Cloudstack current latest version, 4.20
deb [signed-by=/etc/apt/keyrings/cloudstack.gpg] http://packages.shapeblue.com/cloudstack/upstream/debian/4.20 /

sudo apt update
sudo apt install cloudstack-management mysql-server
You have to update apt first to get the new repository to show up. This will take a long time (an hour or two).

Open mysql config file
sudo nano /etc/mysql/mysql.conf.d/mysqld.cnf
MySQL Configuration involves adjusting settings in the MySQL configuration file to optimize the server's performance and behavior. The file is typically located at /etc/mysql/mysql.conf.d/mysqld.cnf on Linux systems.
By modifying key parameters, you can control aspects such as:
- server-id: A unique identifier for the MySQL server in a replication setup.
- sql-mode: Defines SQL modes for enforcing stricter rules, such as disallowing division by zero or enforcing non-zero date values.
- innodb_rollback_on_timeout: Enables automatic rollback of InnoDB transactions if a timeout occurs.
- innodb_lock_wait_timeout: Specifies the timeout duration for locking waits in InnoDB.
- max_connections: Sets the maximum number of concurrent connections allowed.
- log-bin: Enables binary logging for replication and data recovery.
- binlog-format: Defines the format for the binary log (e.g., 'ROW' for row-based logging).
Copy these lines to under the [mysqld] section:
server-id = 1
sql-mode="STRICT_TRANS_TABLES,NO_ENGINE_SUBSTITUTION,ERROR_FOR_DIVISION_BY_ZERO,NO_ZERO_DATE,NO_ZERO_IN_DATE,NO_ENGINE_SUBSTITUTION"
innodb_rollback_on_timeout=1
innodb_lock_wait_timeout=600
max_connections=1000
log-bin=mysql-bin
binlog-format = 'ROW'

Restart mysql service
systemctl restart mysql

Check mysql service status
systemctl status mysql
There should be "active (running)" and the Status is "Server is operational".

Deploy Database as Root and Then Create "cloud11" User with Password "cloud11" too. Change the password and IP address to yours.
sudo cloudstack-setup-databases cloud:cloud@localhost --deploy-as=root:grup11 -i 192.168.1.3
You should get this message if you're succesful

sudo apt install nfs-kernel-server quotaPaste this line into /etc/exports:
/export *(rw,async,no_root_squash,no_subtree_check)
Make two directories, each for primary and secondary storage:
sudo mkdir -p /export/primary /export/secondary
sudo exportfs -aNFS (Network File System) is a protocol that allows remote access to files over a network, enabling a system to share files and directories with other systems as if they were local. NFS allows users and programs to access files on remote computers in a similar way to how they access local storage, providing transparency in accessing data across multiple systems. It is commonly used in distributed file systems and network storage solutions. NFS operates over TCP/IP and is typically used in UNIX and Linux environments, although it is also available for other operating systems.
Paste this line into /etc/default/nfs-kernel-server:
RPCMOUNTDOPTS="-p 892 --manage-gids"
RPCNFSDCOUNT=8
RPCSVCGSSDOPTS=""
Paste this line into /etc/default/nfs-common:
STATDOPTS="--port 662 --outgoing-port 2020"
NEED_STATD=yes
Paste this line into /etc/default/quota:
RPCRQUOTADOPTS="-p 875"
Then restart the service:
service nfs-kernel-server restart
In this project we will use KVM. KVM (Kernel-based Virtual Machine) is an open-source virtualization technology built into the Linux kernel. It enables a Linux system to act as a hypervisor, allowing it to run multiple virtual machines (VMs), each with its own isolated environment, using the same physical hardware resources.
sudo apt install qemu-kvm cloudstack-agent
Enable vnc_listen in /etc/libvirt/qemu.conf (scroll down a bit):

Enable LIBVIRTD_ARGS="--listen" in /etc/default/libvirtd:

Paste in lines to /etc/libvirt/libvirtd.conf:
listen_tls = 0
listen_tcp = 1
tcp_port = "16509"
mdns_adv = 0
auth_tcp = "none"
auth_tls = "none"
Restart libvirtd:
systemctl mask libvirtd.socket libvirtd-ro.socket libvirtd-admin.socket libvirtd-tls.socket libvirtd-tcp.socket
systemctl restart libvirtd
Paste in lines to /etc/sysctl.conf:
net.bridge.bridge-nf-call-arptables = 0
net.bridge.bridge-nf-call-iptables = 0
Confirm the configuration:
sysctl -pGenerate UUID Install the uuid package and generate a unique UUID for the system:
sudo apt install uuid
uuid
This configuration ensures proper networking settings for Docker and generates a unique system identifier (UUID) for use in services like Docker, Kubernetes, or any other service that requires unique identifiers.
Paste in the UUID into /etc/libvirt/libvirtd.conf:
host_uuid = "$UUID"
Restart the service:
systemctl restart libvirtd
Just paste this (change the IP Address to yours):
NETWORK=192.168.1.11/24
sudo iptables -A INPUT -s $NETWORK -m state --state NEW -p udp --dport 111 -j ACCEPT
sudo iptables -A INPUT -s $NETWORK -m state --state NEW -p tcp --dport 111 -j ACCEPT
sudo iptables -A INPUT -s $NETWORK -m state --state NEW -p tcp --dport 2049 -j ACCEPT
sudo iptables -A INPUT -s $NETWORK -m state --state NEW -p tcp --dport 32803 -j ACCEPT
sudo iptables -A INPUT -s $NETWORK -m state --state NEW -p udp --dport 32769 -j ACCEPT
sudo iptables -A INPUT -s $NETWORK -m state --state NEW -p tcp --dport 892 -j ACCEPT
sudo iptables -A INPUT -s $NETWORK -m state --state NEW -p tcp --dport 875 -j ACCEPT
sudo iptables -A INPUT -s $NETWORK -m state --state NEW -p tcp --dport 662 -j ACCEPT
sudo iptables -A INPUT -s $NETWORK -m state --state NEW -p tcp --dport 8250 -j ACCEPT
sudo iptables -A INPUT -s $NETWORK -m state --state NEW -p tcp --dport 8080 -j ACCEPT
sudo iptables -A INPUT -s $NETWORK -m state --state NEW -p tcp --dport 8443 -j ACCEPT
sudo iptables -A INPUT -s $NETWORK -m state --state NEW -p tcp --dport 9090 -j ACCEPT
sudo iptables -A INPUT -s $NETWORK -m state --state NEW -p tcp --dport 16514 -j ACCEPT
#sudo iptables -A INPUT -s $NETWORK -m state --state NEW -p udp --dport 3128 -j ACCEPT
#sudo iptables -A INPUT -s $NETWORK -m state --state NEW -p tcp --dport 3128 -j ACCEPT
Then install iptables-persistent and press yes when prompted to save current IPv4 and IPv6 rules. Don't worry when it says removing cloudstack-agent, just continue.
sudo apt install iptables-persistent
Check the existence and content of /etc/iptables/rules.v4.
Install cloudstack-agent again. And just save the configuration into another file for safe keeping.
sudo touch /etc/iptables/rules.v4.bak
sudo iptables-save
# Save the configuration to rules.v4.bak
sudo apt install cloudstack-agent
AppArmor is a security module for the Linux kernel that provides MAC for restricting the capabilities of programs, limiting the actions they can perform. It is used to enforce security policies, isolating and protecting processes from potentially malicious actions.
sudo ln -s /etc/apparmor.d/usr.sbin.libvirtd /etc/apparmor.d/disable/
sudo ln -s /etc/apparmor.d/usr.lib.libvirt.virt-aa-helper /etc/apparmor.d/disable/
sudo apparmor_parser -R /etc/apparmor.d/usr.sbin.libvirtd
sudo apparmor_parser -R /etc/apparmor.d/usr.lib.libvirt.virt-aa-helper
These steps will effectively disable AppArmor's security policies for libvirtd, allowing it to operate without the restrictions imposed by AppArmor.
sudo cloudstack-setup-management
systemctl status cloudstack-management
tail -f /var/log/cloudstack/management/management-server.log #if you want to troubleshoot
#wait until all services (components) running successfully
Open your web browser and connect to http://<YOUR_IP_ADDRESS>:8080.
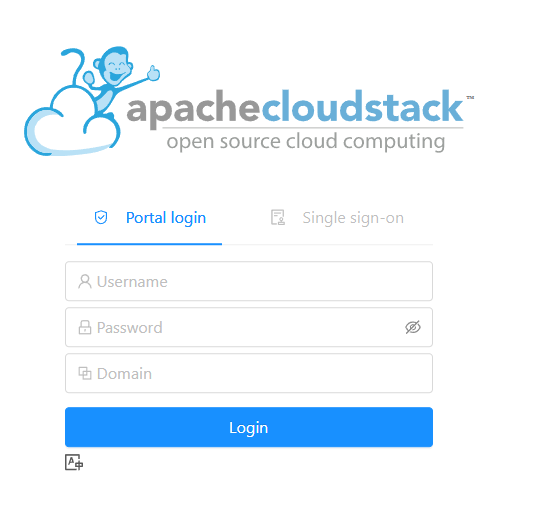
Username: admin
Password: password
You can change the password if you want.
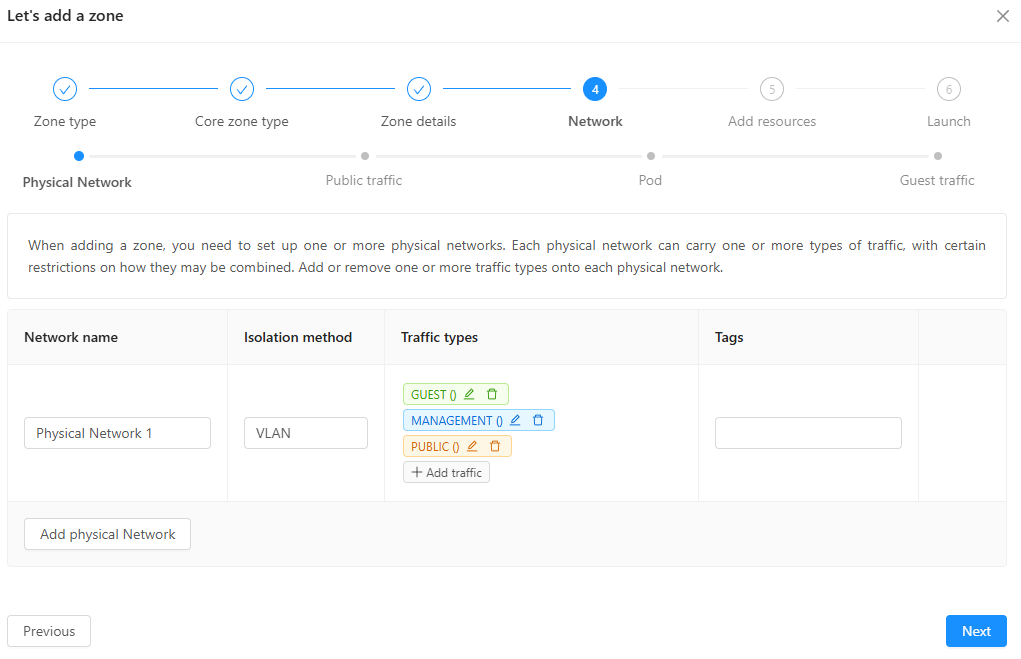
- Skip the physical network
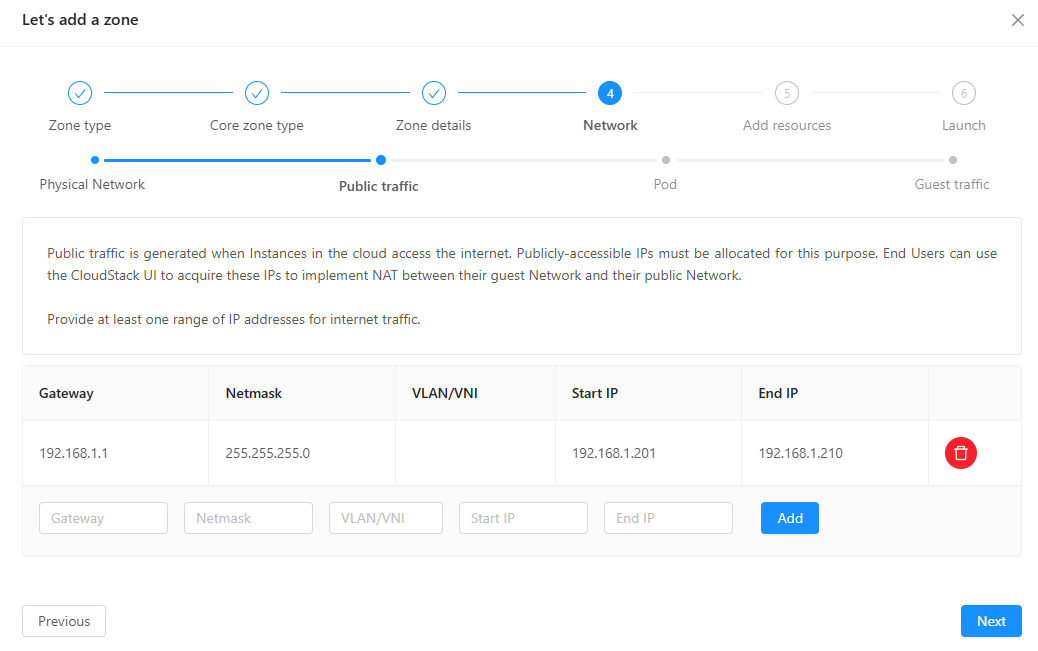
- For public traffic: reserve a range of IP addresses
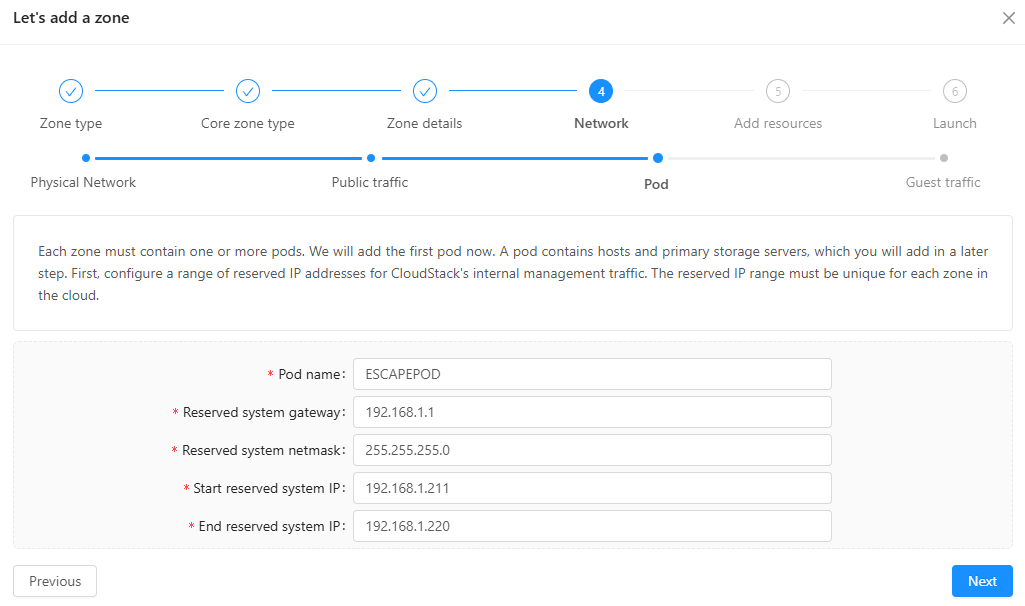
- For Pod: make a new Pod with a range of reserved IP addresses
- For Guest Traffic: use 3300-3399
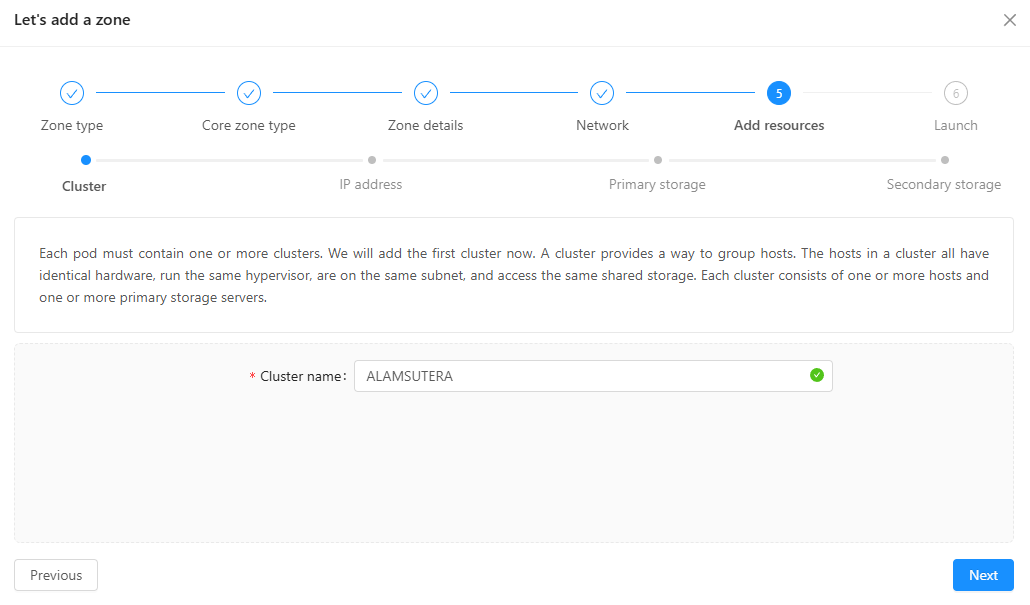
- For cluster, make a new cluster
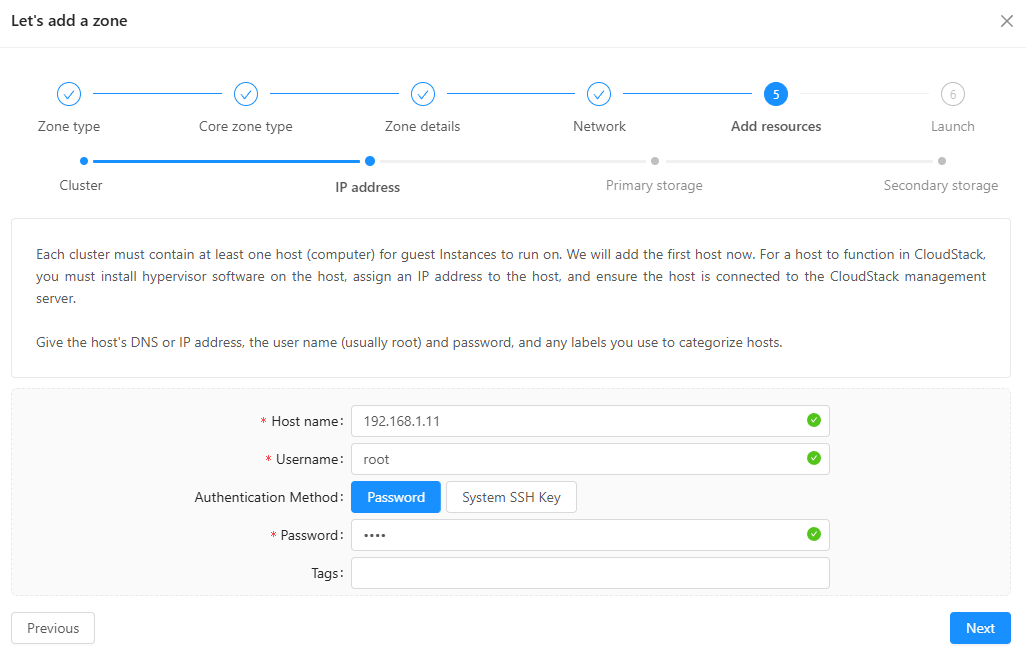
- For IP address: insert the Management Server's IP Address and use the root's login credentials
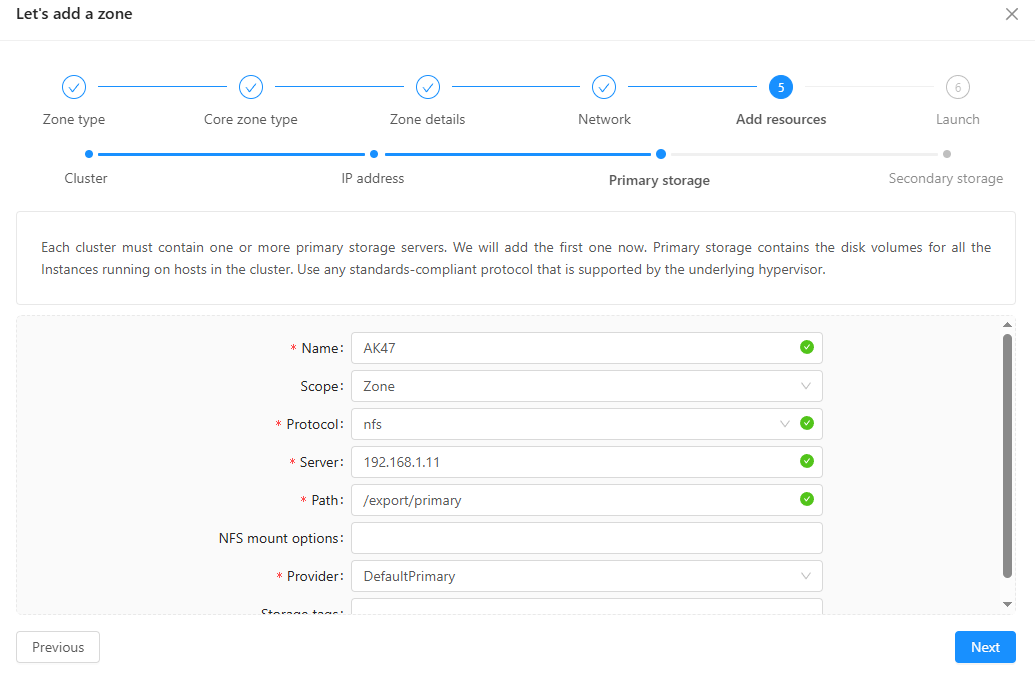
- For Primary storage:
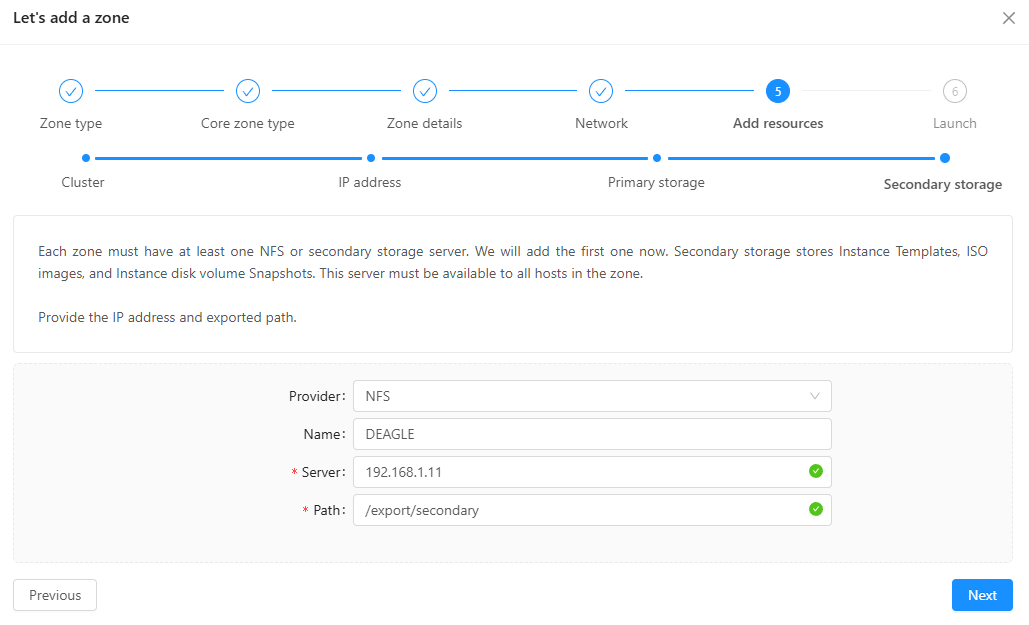
- For Secondary storage:
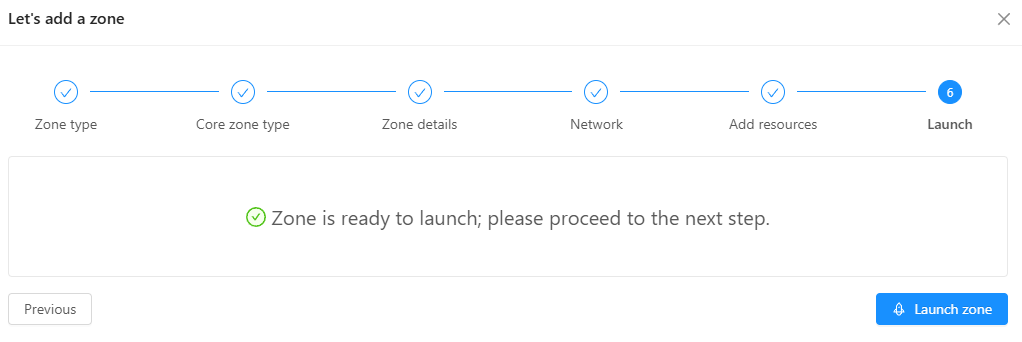
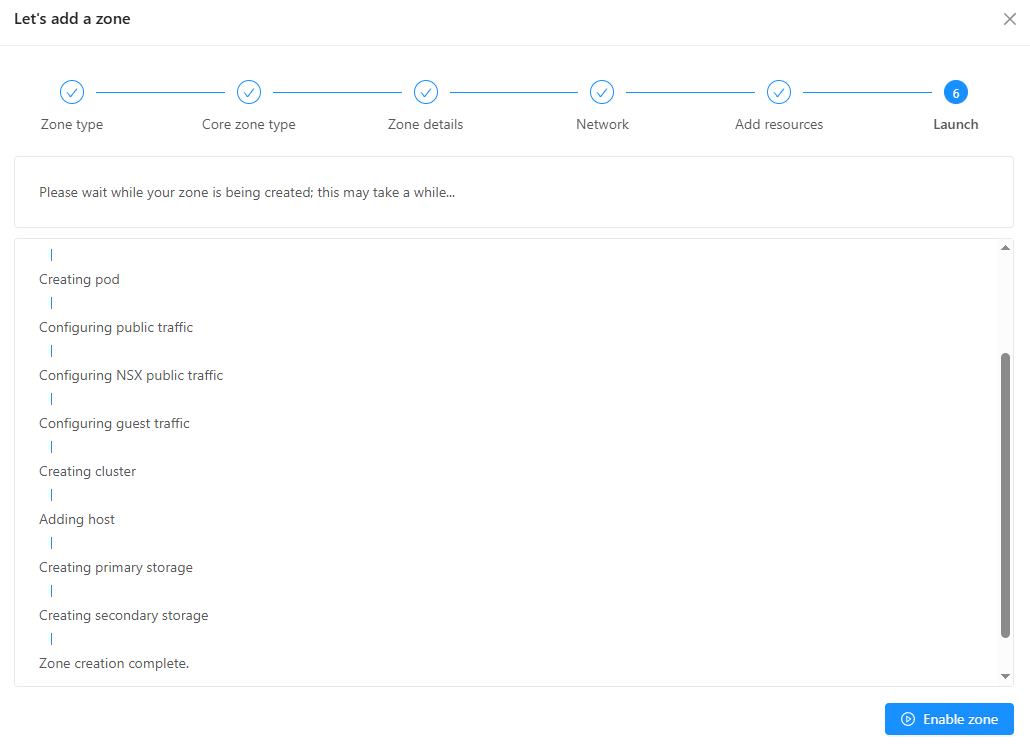
Success! Zone is launched.
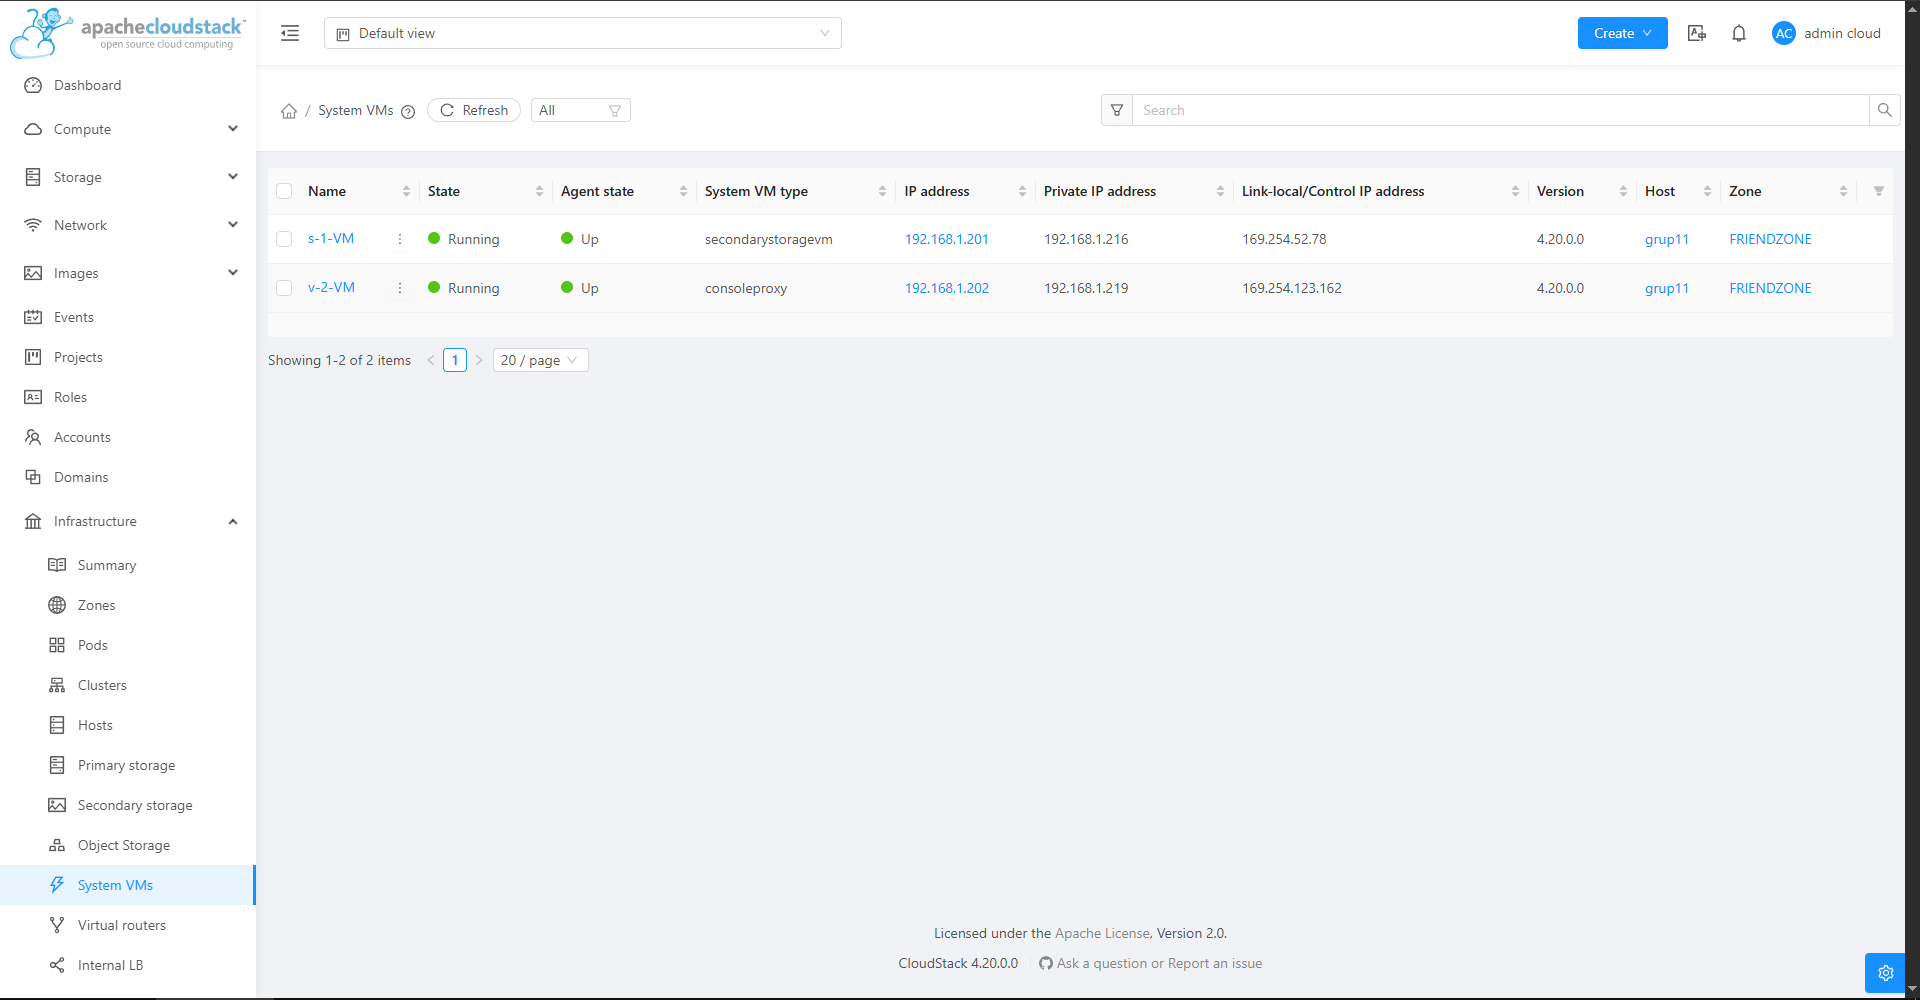
Make sure the two system VMs are running:
 After this, you should be able to safely reboot the server and comeback to this web console successfully.
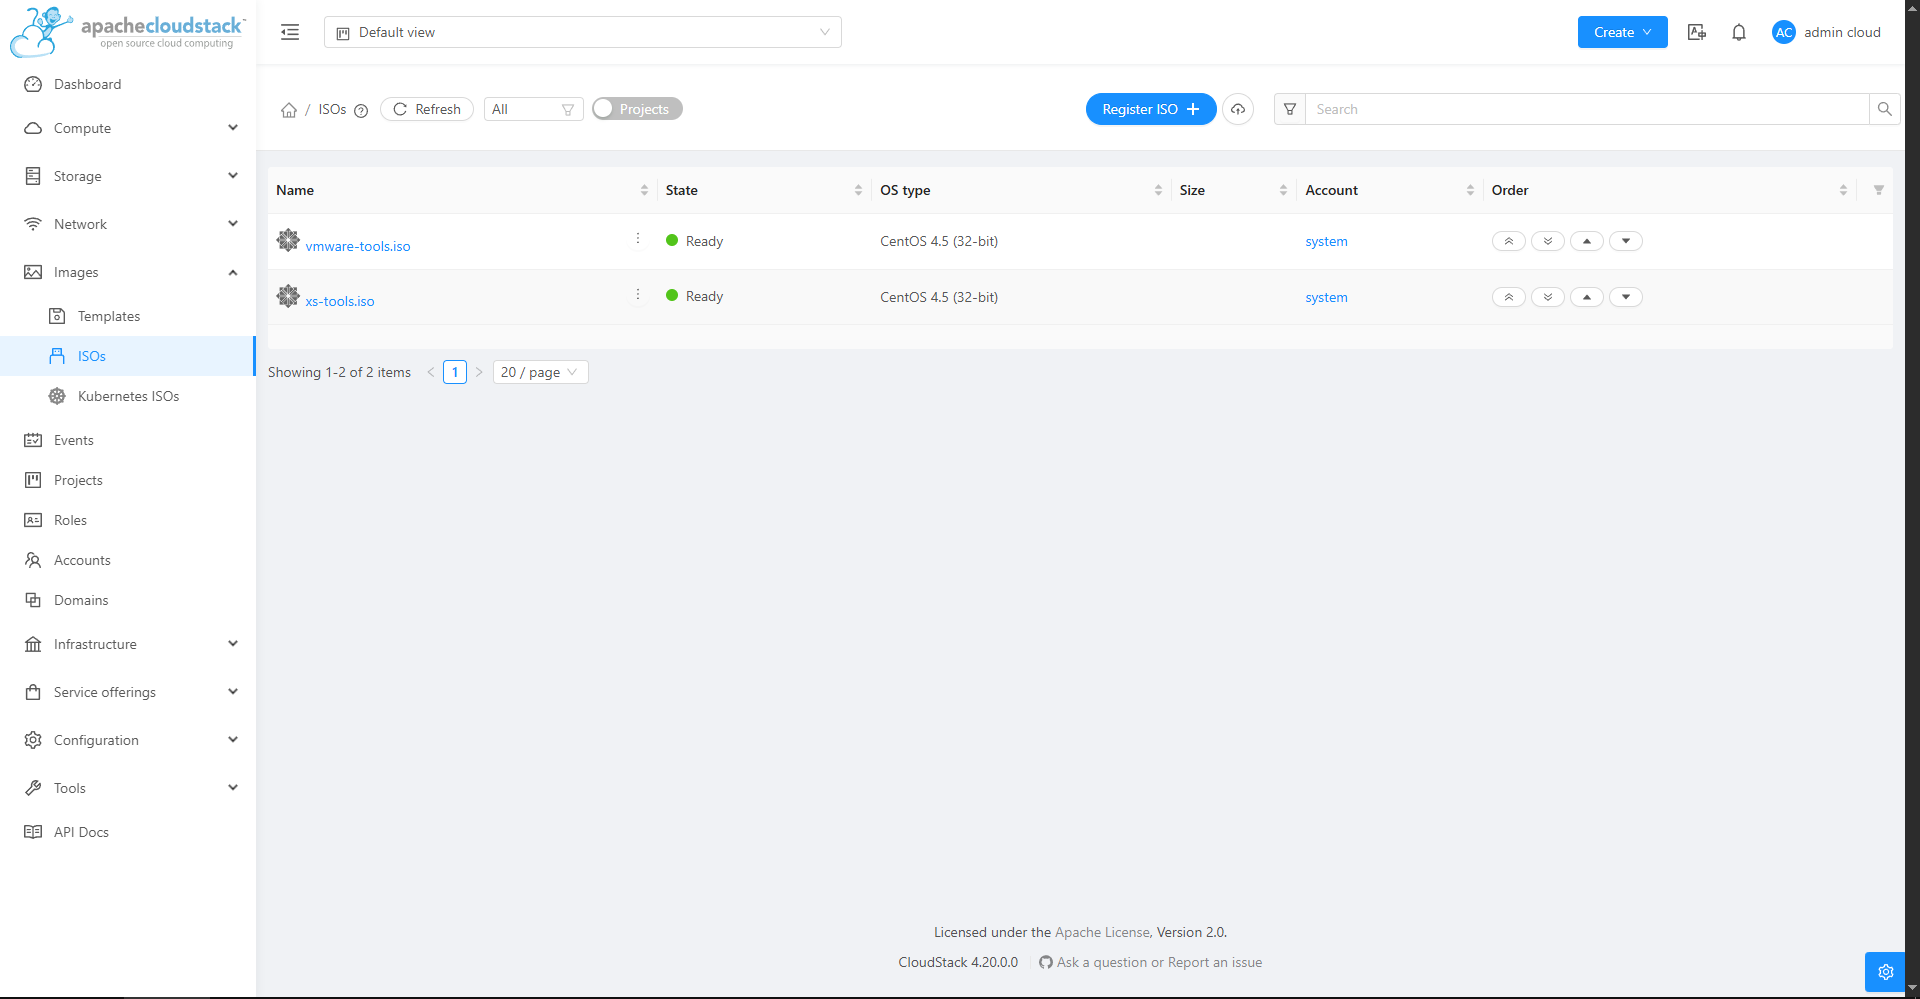
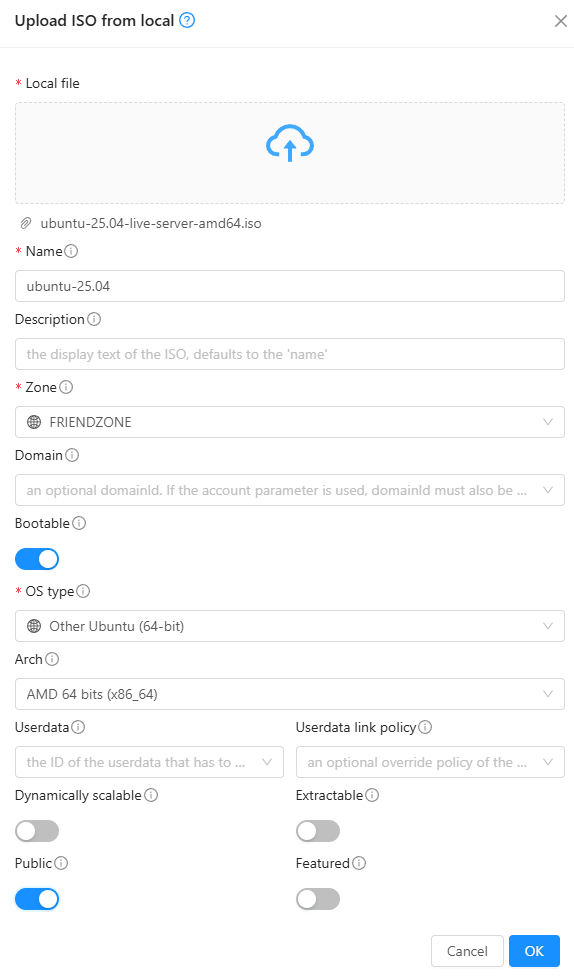
Register ISOs onto Cloudstack, either through a URL or upload it from your computer.

 Then you can create templates based on those instances. Then, those templates can be used to create instances.
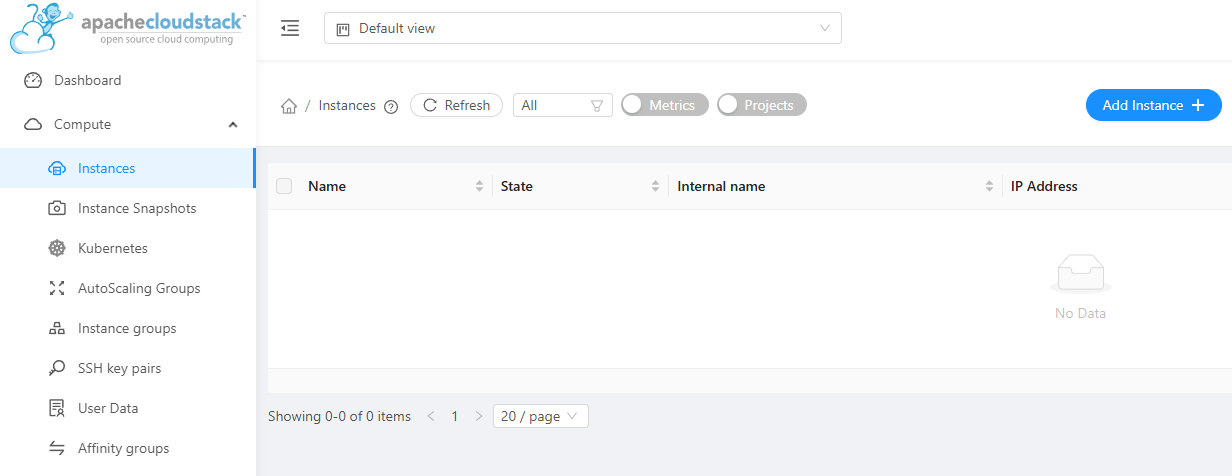
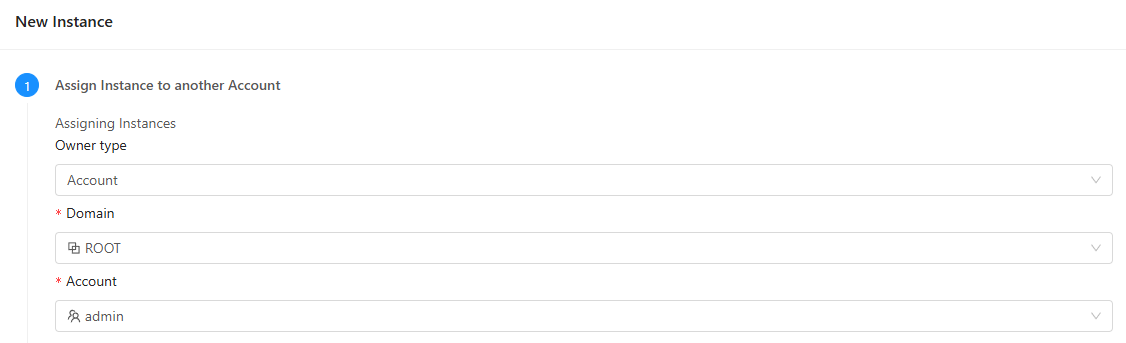
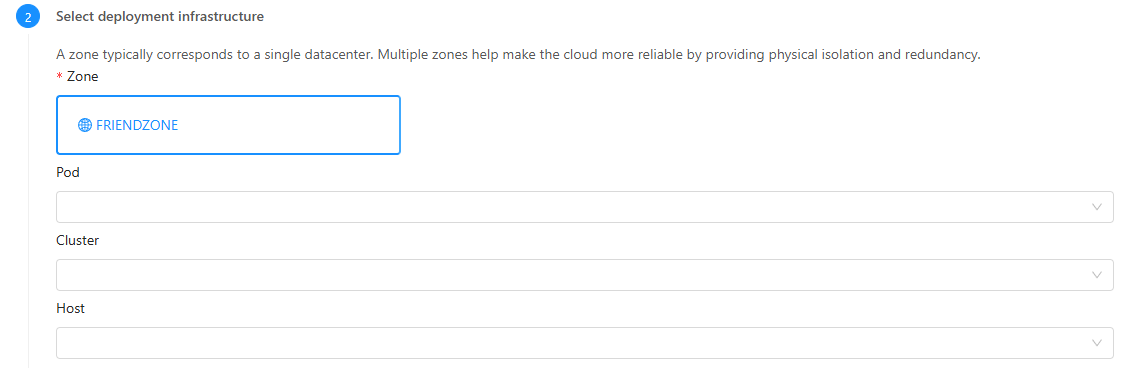
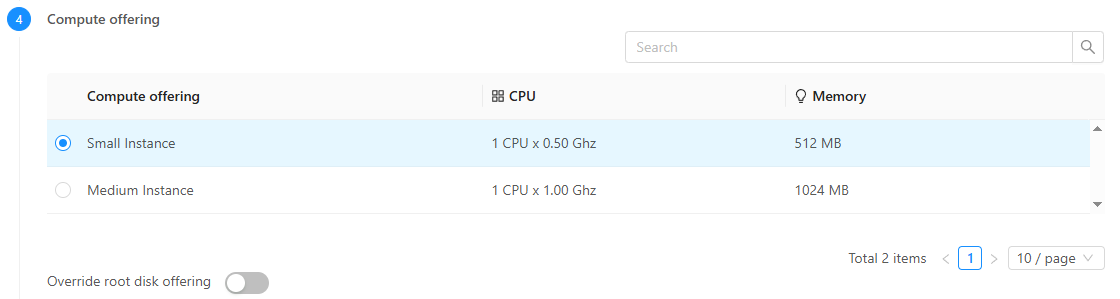
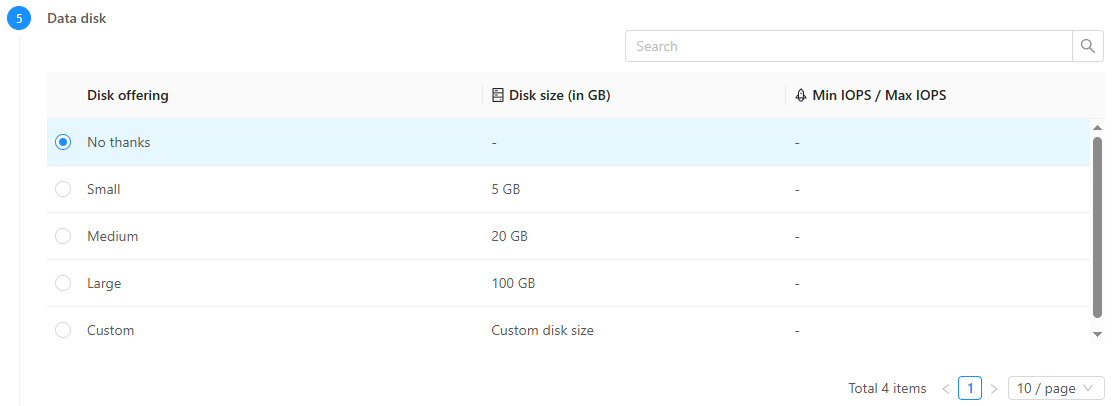
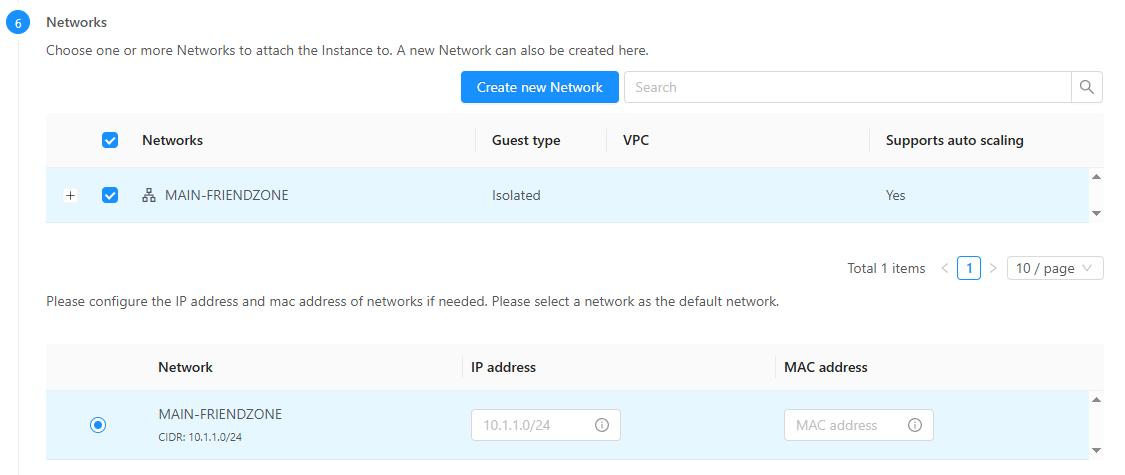
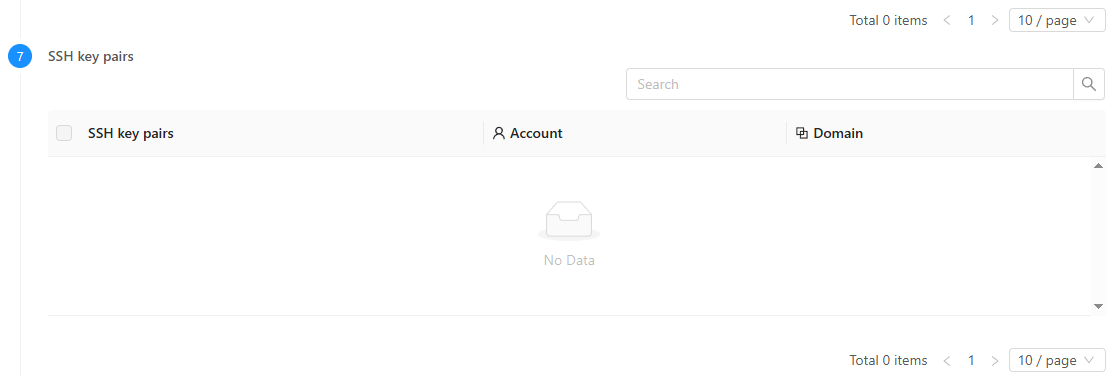
Go to Compute > Instances then click Add Instance


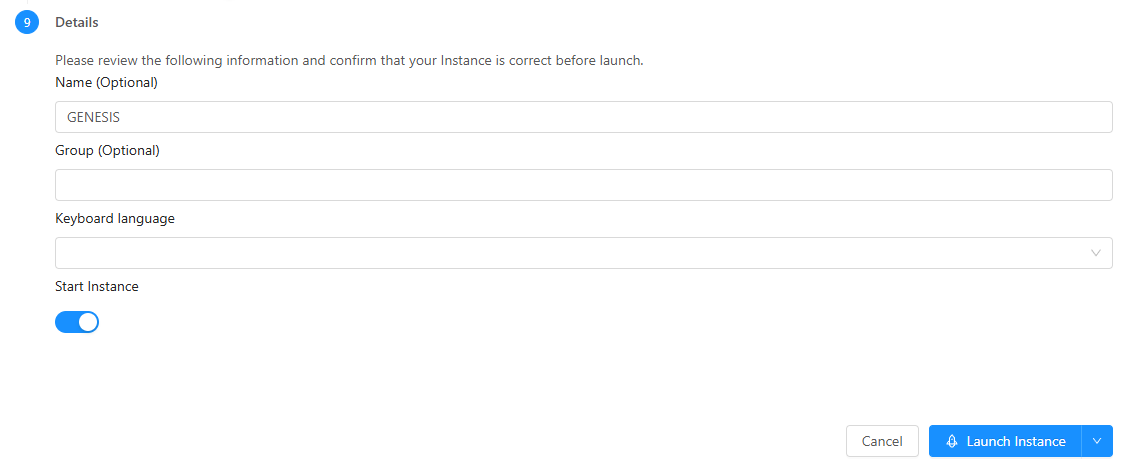


Successfully launched!
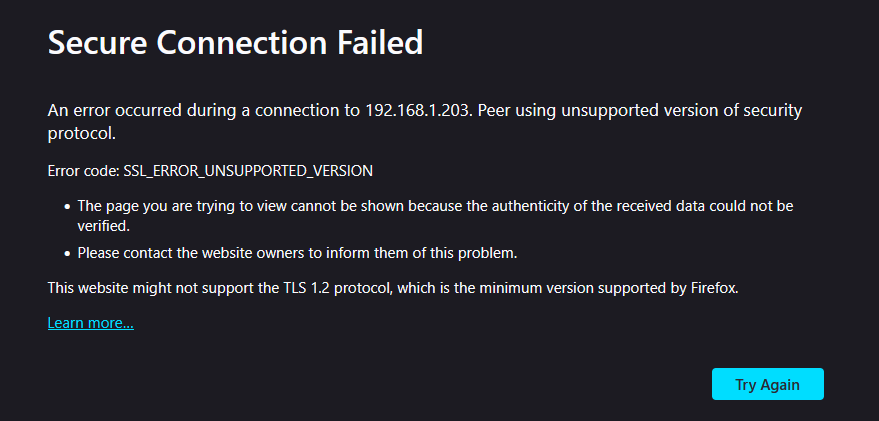
The default CentOS instance on Cloudstack 4.20 is of version 5.5. It's EOL is on 31 March 2017, more than 8 years ago. Which means that things will fall apart, especially with getting packages from the repository.
Make an isolated network. Then allow all egress from that network. Voila!
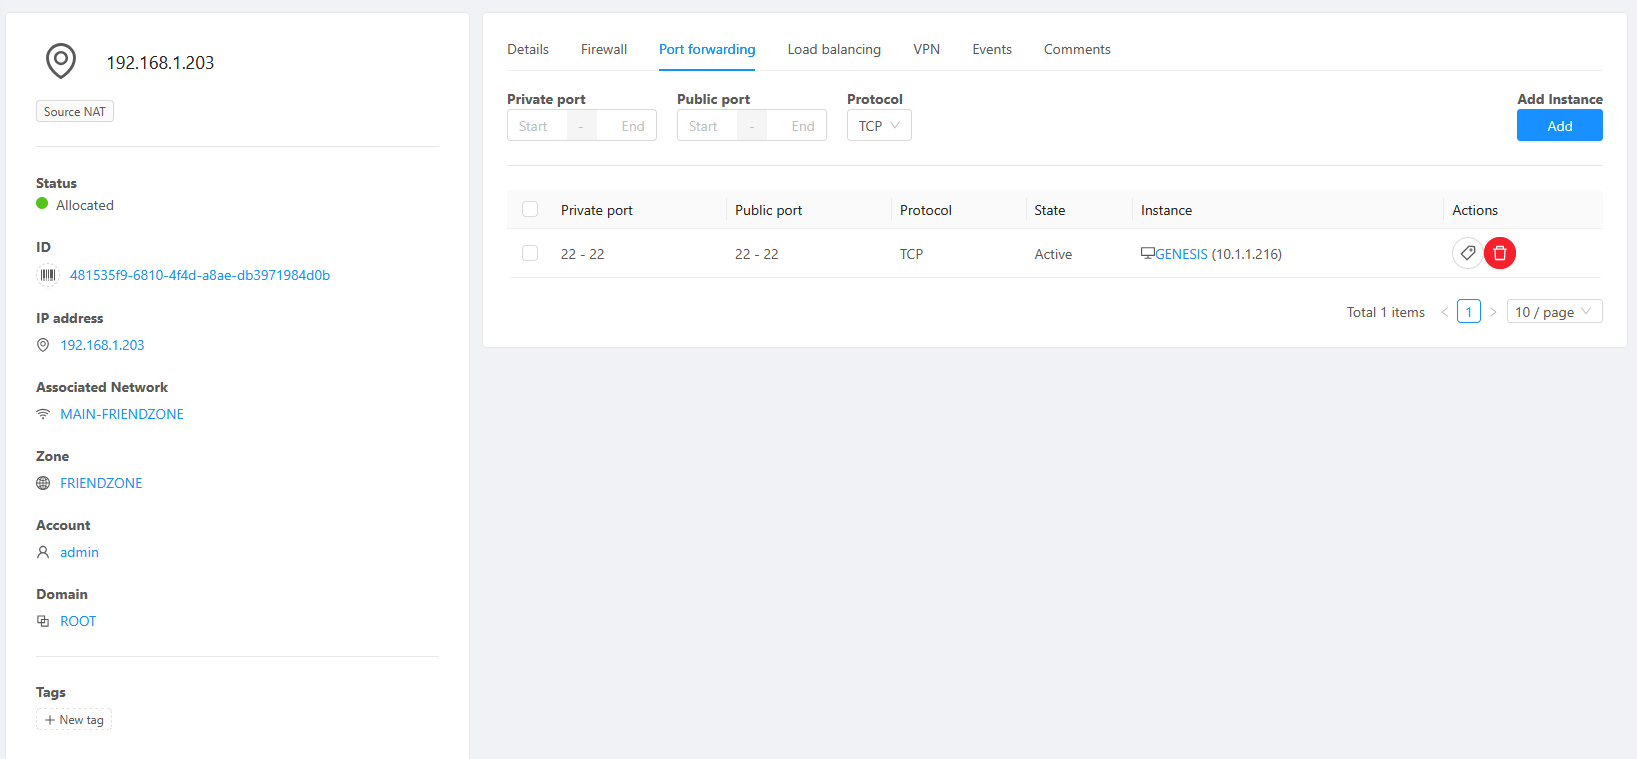
Go to the Source NAT and enable firewall (because it's default deny).

Then port forward the port 22 (SSH) into the instance
We need to use yum to install OpenSSH, but it's not gonna work because it's past EOL and the repo links are dead. So we have to configure it:
sudo nano /etc/yum.repos.d/CentOS-Base.repoLook for the every section, like [base] and uncomment the lines starting with baseurl by removing the leading # from the baseurl line. Comment out all mirrorlist lines aswell.
Update all instances of http://mirror.centos.org/ to http://archive.kernel.org/centos-vault/
and replace $releasever into the release version (in this case 5.5).
https://stackoverflow.com/a/73817913
Sidenote: use this if somehow by some reason you accidentally uninstalled yum (which i did):
rpm -Uvh http://archive.kernel.org/centos-vault/5.5/os/x86_64/CentOS/yum-fastestmirror-1.1.16-14.el5.centos.1.noarch.rpm http://archive.kernel.org/centos-vault/5.5/os/x86_64/CentOS/yum-3.2.22-26.el5.centos.noarch.rpm http://archive.kernel.org/centos-vault/5.5/os/x86_64/CentOS/yum-updatesd-0.9-2.el5.noarch.rpmThen install OpenSSH:
sudo yum update
sudo yum install openssh-server openssh-clientssudo service sshd start
sudo service sshd statusThen you can ssh into the instance!
sudo yum install httpd mod_sslFill in the blanks:
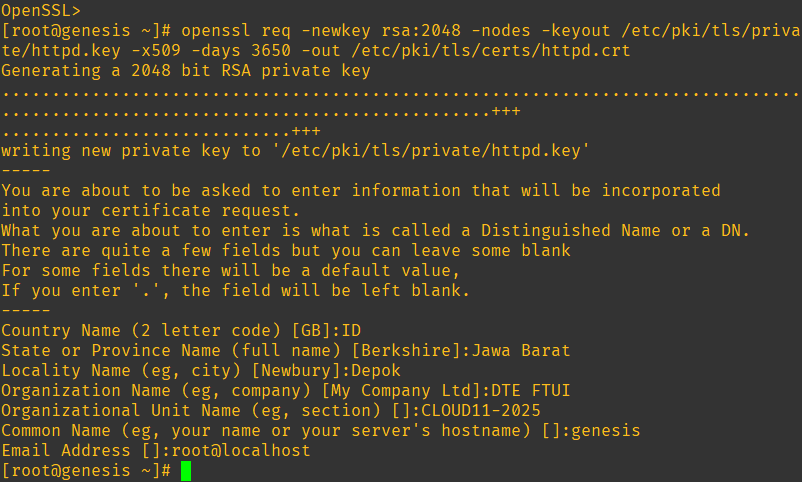
Verify the files were created:
ls -l /etc/pki/tls/private/ /etc/pki/tls/certs/
Make a directory from which the webserver will serve the web content:
mkdir /var/www/https
echo "Hello, World" > /var/www/https/index.html
Modify the /etc/httpd/conf.d/ssl.conf file to configre httpd to use the keys and the directory (scroll down a bit):


Start the httpd service
sudo service httpd start
netstat -tlpn
Modify the firewall to allow https traffic (or in this case, allow everything everywhere all at once because i'm lazy)
iptables -I INPUT -j ACCEPT
iptables -I OUTPUT -j ACCEPT
iptables -I FORWARD -j ACCEPT
Don't forget to configure the port forwarding of Cloudstack.
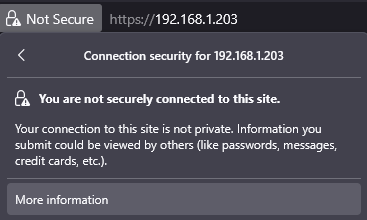
When browsing, there will be a warning: