React
React is not a framework.
It's an UI library.
It's the "V" in MVC.
DOM manipulation can get really slow in web apps.
Every time you modify the DOM, the browser does the job (parses html, sets layout, etc)
If you modify the dom in several places in your source code, the flow may be repeated many times and unnecessary operations may be executed.

Have a look at this code: https://codesandbox.io/s/oxqlz8089y
Inspect DOM changes with DevTools. All elements are recreated every time.
We could modify our code to append/remove only the corresponding DOM element each time.
But what would happen when we add filtering, sorting, etc? A specific optimal DOM manipulation might be implemented each time.
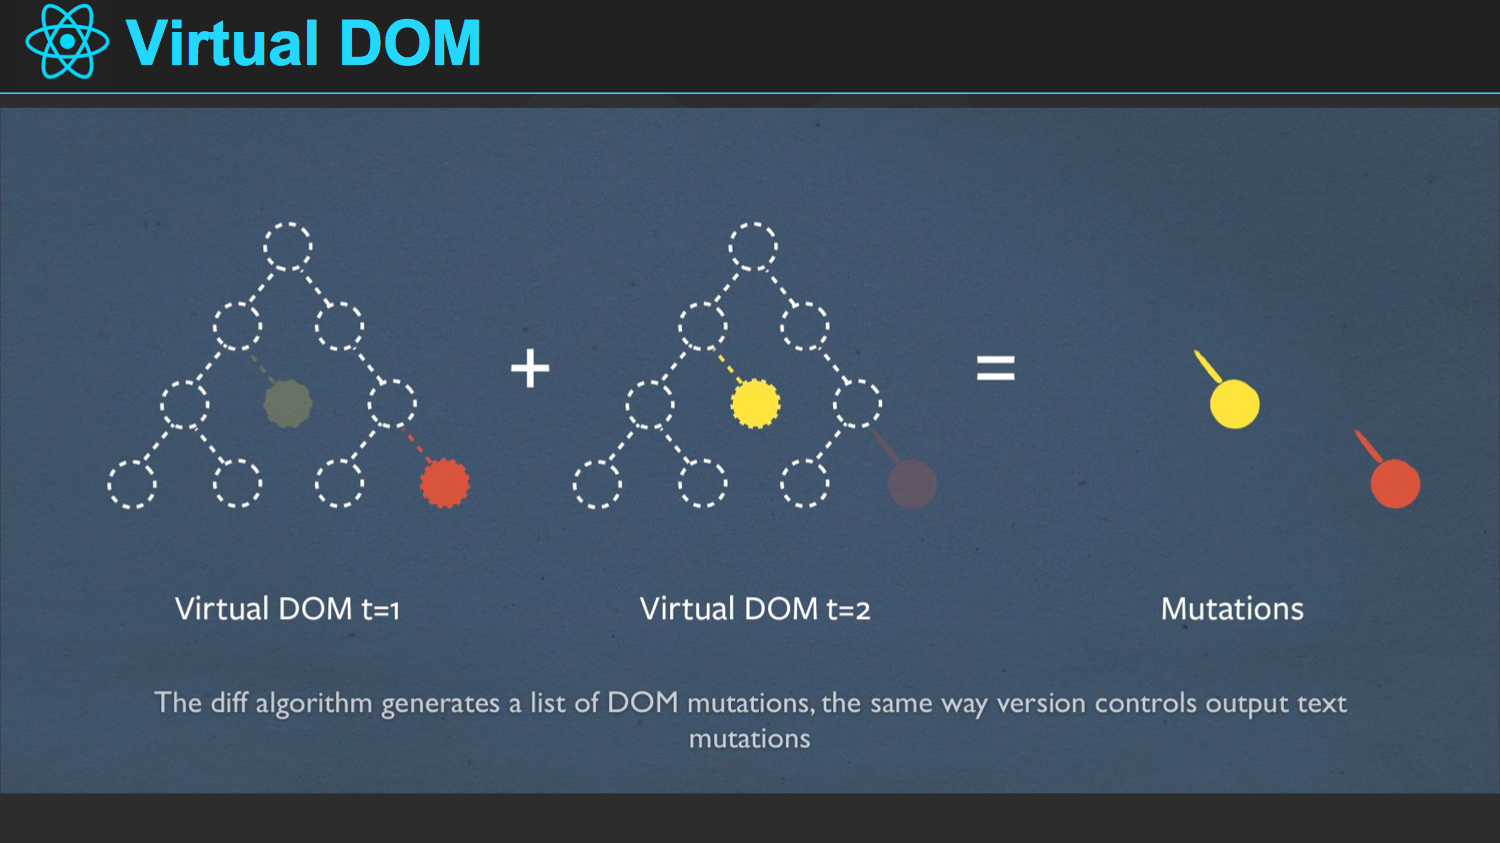
What if we had something to compare effectively the "before and after" of the DOM to only modify what's needed ?
The Virtual DOM is an abtraction of the DOM in form of plain objects.
React keeps a virtual tree representing the DOM (given by declaration of components). When there's a change, it creates a new Virtual DOM with the changes.
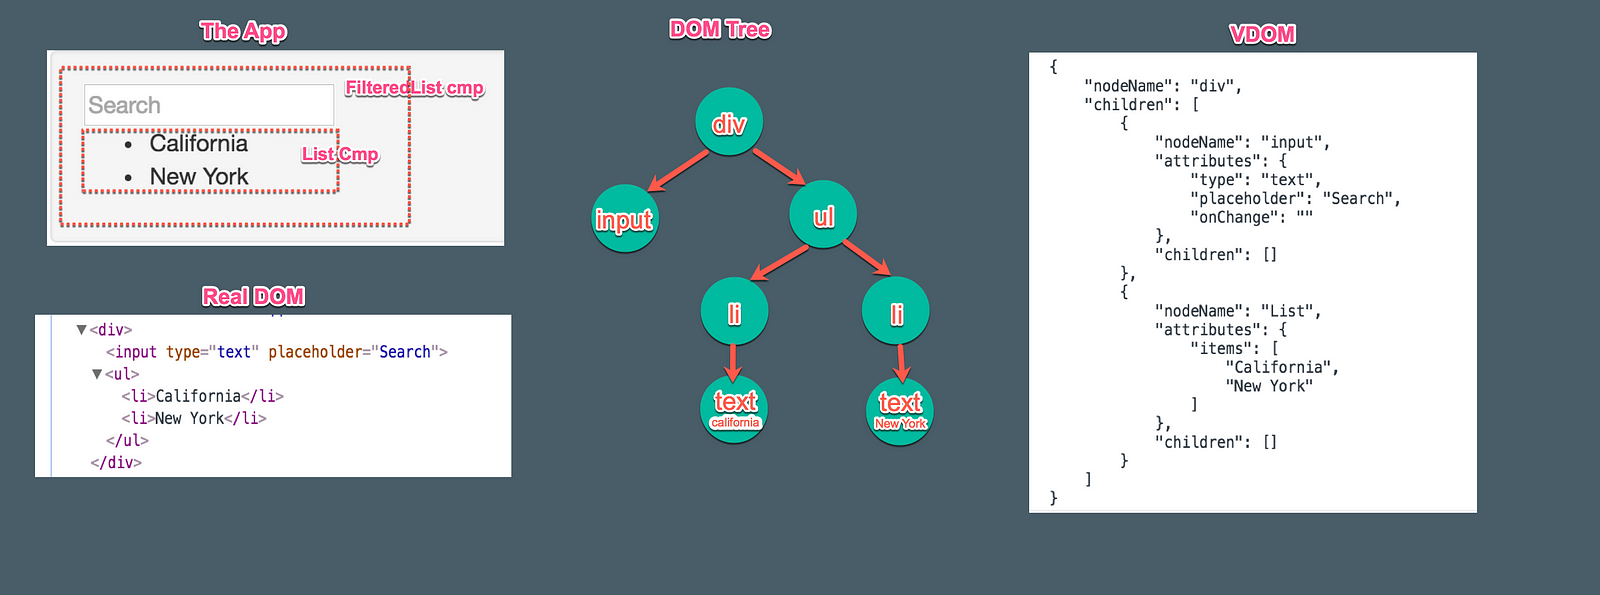
Each time the VirtualDOM changes, React compares those changes with the current virtual dom and applies those changes in minimal number of steps to the real dom.
import React from 'react'

React.createElement(
  type,
  [props],
  [...children]
)
React code
import React from 'react'

React.createElement('div', { align: 'center' }, 'Welcome to JS Training')
DOM result
<div align='center'>
    Welcome to JS Training - React
</div>
https://codesandbox.io/s/04nw9zpxxl
With children elements
import React from 'react'
const reactElement = React.createElement(
  'div',
  { align: 'center' },
  'Welcome to JS Training - React',
  React.createElement('br', null),
  React.createElement('button', null, 'Start !')
)<div align='center'>
Welcome to JS Training - React<br />
<button>Start !</button>
</div>https://codesandbox.io/s/9yrxv8y28o
JSX is a syntax extension to JavaScript. It's helpful as a visual aid when working with UI inside the JavaScript code.
JavaScript
import React from 'react'
const reactElement = React.createElement(
  'div',
  { align: 'center' },
  'Welcome to JS Training'
)
JSX
import React from 'react'

const reactElement = <div align="center">Welcome to JS Training - React</div>
JavaScript (using children)
import React from 'react'

const reactElement = React.createElement(
  'div',
  { align: 'center' },
  'Welcome to JS Training - React',
  React.createElement('br', null),
  React.createElement('button', null, 'Start !')
)
JSX (using children)
const reactElement = (
  <div align="center">
    Welcome to JS Training - React <br />
    <button>Start !</button>
  </div>
)
https://codesandbox.io/s/n57xo06j44
With JSX, we can declare the VirtualDOM with a syntax very similar to HTML.
Although, JSX is still JavaScript, not a template language.
The "markup" is compiled to a Raw React declaration of elements as seen previously.
As JSX is Javascript, any expression can be embedded using
{}
const userName = 'Evan Graham'
const reactElement = (
  <div align="center">
    Welcome to JS Training, {userName.toUpperCase()} !
    <br />
    <button>Start !</button>
  </div>
)<div align='center'>
Welcome to JS Training, EVAN GRAHAM !
<br />
<button></button>
</div>https://codesandbox.io/s/3vkr326njq
You can use lazy operators or ternaries to conditionnaly render certain parts of your component.
const reactElement = (
  <div align="center">
    Welcome to JS Training{userName && `, ${userName.toUpperCase()}`}
    <br />
    {userName ? <button>Start !</button> : <button>Login</button>}
  </div>
)Array of elements are accepted as children, so you can easily map them from any data array.
JSX
const items = ['Topic 1', 'Topic 2', 'Topic 3']
const reactElement = <ul>{items.map(item => <li>{item}</li>)}</ul>
HTML
<ul align='center'>
  <li>Topic 1</li>
  <li>Topic 2</li>
  <li>Topic 3</li>
</ul>React provides built-in shortcuts for creating commonly used HTML element nodes like
<button>,<a>,<div>, etc.When you use a
<div>or any other know element in JSX, you're actually instantiating a built-in element.
Built-in elements will accept as props any of their HTML-related attributes.
Although, React provides a JavaScript-centric API to the DOM.
Since React components often take both custom and DOM-related props, React uses the
camelCaseconvention just like the DOM APIs:
HTML
<div tabindex="-1"/>
<div class="Button" />
<input
  readonly
  style="font-size: 12px;"
/>
JSX (DOM properties)
<div tabIndex="-1" />      // Just like node.tabIndex DOM API
<div className="Button" /> // Just like node.className DOM API
<input
  readOnly={true}
  style={{fontSize: '12px'}}
/> // Just like node.readOnly DOM APIOn updates, React only changes what's necessary.
function update() {
  const userName = 'Evan Graham'
  const reactElement = (
    <div align="center">
      Welcome to JS Training,
      <strong> {userName.toUpperCase()}</strong>
      <br />
      Time {new Date().toLocaleTimeString()}.
    </div>
  )
  render(reactElement, document.getElementById('root'))
}

setInterval(update, 1000)
Inspect DOM changes with DevTools https://codesandbox.io/s/3rlm92jnw5
Components let you split the UI into independent, reusable pieces, and think about each piece in isolation.
Functional components are functions that only receive props.
As pure functions, they are stateless.
./App.js
export default props => (
  <div align="center">
    Welcome to JS Training,
    <strong> {props.userName.toUpperCase()}</strong>
    <br />
    Time {props.time}.
  </div>
)
./index.js
import App from './App'
<App
  userName="Evan Graham"
  time={new Date().toLocaleTimeString()}
/>
https://codesandbox.io/s/9j7joyo79r
Classes have some additional features that will be discussed later.
In classes,
propsare a member ofthisand React callsrendermethod on every reflow.
class AppComponent extends React.Component {
  render() {
    const { userName, time } = this.props
    return (
      <div align="center">
        Welcome to JS Training,
        <strong>{userName.toUpperCase()}</strong>
        <br />
        Time {time}.
      </div>
    )
  }
}

export default AppComponent
v
Class components can manage their state.
Each state change will trigger a "re-render" from React.
State can be read in
this.stateproperty.
State must be set with
this.setStatemethod.
Let's put time as part of the state of <AppComponent>.
https://codesandbox.io/s/7wnkx5vx7j?module=%2FApp.js
class AppComponent extends React.Component {
  state = { time: null }

  constructor() {
    super()
    setInterval(() => {
      this.setState({
        time: new Date().toLocaleTimeString()
      })
    }, 1000)
  }

  render() {
    const { userName } = this.props
    const { time } = this.state
    return (
      <div align="center">
        Welcome to JS Training,
        <strong> {userName.toUpperCase()}</strong>
        <br />
        Time {time}.
      </div>
    )
  }
}
https://codesandbox.io/s/q3vz183wm4?&module=%2FApp.js
Components can refer to other components in their output. This lets us use the same component abstraction for any level of detail.
A button, a form, a dialog, a screen: in React apps, all those are commonly expressed as components.
Let's split our code into components to end up with something like:
<div align="center">
  <Welcome userName={userName} />
  <br />
  Time <Clock />.
</div>
https://codesandbox.io/s/q3vz183wm4?&module=%2FApp.js
Clock is now a component that manages its own stsate and is easily resusable.
class Clock extends React.Component {
  state = { time: null }

  constructor() {
    super()
    setInterval(this._updateTime.bind(this), 1000)
  }

  _updateTime() {
    this.setState({
      time: new Date().toLocaleTimeString()
    })
  }

  render() {
    const { time } = this.state
    return <span>{time}</span>
  }
}
https://codesandbox.io/s/30jkqqzmkp?module=%2Fcomponents%2FClock.js
React injects as
props.childreneverything that was put inside your component.
Then, it's a great opportunity to make components wrappers (layout components for instances).
const Panel = props => (
  <div
    align="center"
    style={{
      border: '1px solid grey',
      padding: '20px'
    }}
  >
    {props.children}
  </div>
)
Let's try to abrast the layout of our app into a wrapping component.
https://codesandbox.io/s/30jkqqzmkp?module=%2Fcomponents%2FApp.js
const Panel = props => (
  <div
    align="center"
    style={{
      border: '1px solid grey',
      padding: '20px'
    }}
  >
    {props.children}
  </div>
)
https://codesandbox.io/s/kk5j8zlqvo?module=%2Fcomponents%2FApp.js
The following exercises will make you implement - step by step - a React version of Todo App.
Please keep in mind that the css classes expected are the same if you want your results to be style by exercises' stylesheet.
Create a <Title> component and use it in <TodoApp>.
<Title> accepts "text" prop, so the implementation should fit this snippets:
<Title text="todos" />output
<h1>todos</h1>https://codesandbox.io/s/234j97x1kj?module=%2FTodoApp.js
// ./components/Title.js

import React from 'react'
export default ({ text }) => <h1>{text}</h1>Refactor <Title> so it displays the content given by the client.
<Title>todos</Title>output
<h1>todos</h1>// ./components/Title.js
import React from 'react'
export default ({ children }) => <h1>{children}</h1>Handling events with React elements is very similar to handling events on DOM elements.
HTML
<button onclick="activateLasers()">
  Activate Lasers
</button>
JSX
<button onClick={activateLasers}>Activate Lasers</button>As JSX handles javascript expression, any expression can be assigned as a prop.
<button onClick={() => activateLasers()}>Activate Lasers</button>Events are used to communicate events to a component's parent.
In the following code, the <button> built-in component uses onClick callback provided to communicate a click to his parent.
<button onClick={() => console.log(`button clicked !!!`)}>
  Activate Lasers
</button>
Consider:
const LabeledInput = props => (
  <label className="custom-input">
    {props.label}
    <input type="text" />
  </label>
)

const CustomForm = props => (
  <form>
    <LabeledInput label="name" />
    <LabeledInput label="surname" />
  </form>
)
What if CustomForm needs to know whenever an input is edited to make live validation?
Make it accept a callback prop that will notify changes.
const LabeledInput = props => (
  <label className="custom-input">
    {props.label}
    <input type="text" onChange={props.onChange} />
  </label>
)

const CustomForm = props => (
  <form>
    <LabeledInput label="name" onChange={() => console.log('Name changed!')} />
    <LabeledInput
      label="surname"
      onChange={() => console.log('Surname changed!')}
    />
  </form>
)Create a new
<TodoForm>that displays an input form and accepts theses props:
- placeholder: to be displayed in the input
- onNew: a callback executed everytime the users submits a new todo description
<TodoForm
  placeholder="What needs to be done?"
  onNew={todo => console.log('New todo:', todo)}
/>
https://codesandbox.io/s/21r3l6qyrj
const onSubmit = props => e => {
  e.preventDefault()
  const input = e.target[0]
  props.onNew(input.value)
  input.value = ''
}

export default props => (
  <form className="todo-form" onSubmit={onSubmit(props)}>
    <input className="new-todo" name="todo" placeholder={props.placeholder} />
  </form>
)
https://codesandbox.io/s/l2j1nrp27l?module=%2Fcomponents%2FTodoForm.js
We do it all the time in react.
When you pass
propsto a child components, you
Everytime
<Clock>updates its state, it's re-rendered.
It passes a different value for
props.childrento<span>.
Everytime
<span>receives new props, it's re-rendered.
class Clock extends React.Component {
  constructor() {
    super()
    setInterval(() => {
      this.setState({ time: new Date().toLocaleTimeString() })
    }, 1000)
  }

  render() {
    const { time } = this.state
    return <span>{time}</span>
  }
}Create a new
<TodoList>that displays the list oftodosfromprops.items.
<TodoList items={todos} /><ul class="todo-list">
<li class="completed">
<input type="checkbox" class="toggle" />
<label>Description</label>
<button class="destroy"></button>
</li>
<!-- ... -->
</ul>https://codesandbox.io/s/l2j1nrp27l?module=%2FTodoApp.js
import React from 'react'

export default props => (
  <ul class="todo-list">
    {props.items.map(item => (
      <li className={item.done ? 'completed' : ''}>
        <input className="toggle" type="checkbox" checked={item.done} />
        <label>{item.desc}</label>
        <button className="destroy" />
      </li>
    ))}
  </ul>
)
https://codesandbox.io/s/611p3687ww?module=%2Fcomponents%2FTodoList.js
Consider:
Current State:
<ul>
  <li>Evan</li>
  <li>Rachel</li>
</ul>
Next State
<ul>
  <li>Robin</li>
  <li>Evan</li>
  <li>Rachel</li>
</ul>
Inserting an element at the beginning has worse performance.
React will mutate every child instead of realizing it can keep the
<li>Evan</li>and<li>Rachel</li>subtrees intact. This inefficiency can be a problem.
In order to solve this issue, React supports a
keyattribute. React uses the key to match children in the original tree with children in the subsequent tree.
Current State:
<ul>
  <li key={1059}>Evan</li>
  <li key={1098}>Rachel</li>
</ul>
Next State
<ul>
  <li key={1031}>Robin</li>
  <li key={1059}>Evan</li>
  <li key={1098}>Rachel</li>
</ul>
** The key only has to be unique among its siblings, not globally unique. **
Let's fix it in our previous exercise:
https://codesandbox.io/s/611p3687ww?module=%2Fcomponents%2FTodoList.js
When a todo's toggle (checkbox) is clicked,
store.update(item)should be called to update storage.
When a todo's delete button is clicked,
store.remove(item)should be called to update storage.
<TodoList>should reflect the changes on realtime.
Use events (callbacks) and <TodoApp>'s state to make the magic happen.
https://codesandbox.io/s/611p3687ww?module=%2FTodoApp.js
<input
  className="toggle"
  type="checkbox"
  checked={item.done}
  onClick={() => props.onToggleItem(item)}
/>
<label>{item.desc}</label>
<button
  className="destroy"
  onClick={() => props.onDeleteItem(item)}
/>
https://codesandbox.io/s/nv9pw39y4?module=%2FTodoApp.js
When user submits the content of
<TodoForm>,store.add(item)should be called to update storage.
When user clicks on "Clear completed", all "done" items should be remove from storage.
<TodoList>should reflect the changes on realtime.
https://codesandbox.io/s/nv9pw39y4?module=%2FTodoApp.js
<TodoForm
  placeholder="What needs to be done?"
  onNew={this.handleNew.bind(this)}
/>

/* ... */

<button
  className="clear-completed"
  onClick={this.handleClearCompleted.bind(this)}>
  Clear completed
</button>
https://codesandbox.io/s/6wv9rxlmk3?module=%2FTodoApp.js
In
<TodoList>item's logic has been encapsulated in<TodoItem>
Create a
<TimeAgo>component and use it in<TodoItem>so each item displays its time:
<li>
  <input type="checkbox" class="toggle" value="on">
  <label>
    Celebrate with a good lunch <small>(5m 14s)</small>
  </label>
  <button class="destroy"></button>
</li>
Make use of installed dep pretty-ms
https://codesandbox.io/s/4xkjw44yow?module=%2Fcomponents%2FTodoItem.js
export default class TimeAgo extends React.Component {
  constructor(props) {
    super(props)
    this.state = { now: Date.now() }
    setInterval(() => {
      this.setState({ now: Date.now() })
    }, REFRESH_TIME)
  }

  render() {
    const { date } = this.props
    const { now } = this.state
    const timestamp = new Date(date).getTime()
    const diff = now - timestamp
    return prettyMs(diff, PRETTY_MS_OPTIONS)
  }
}
https://codesandbox.io/s/6wv9rxlmk3?module=%2Fcomponents%2FTimeAgo.js
http://ciclo-de-vida-componentes.aprendiendoreact.com/ https://github.com/wojtekmaj/react-lifecycle-methods-diagram
Functional components are pure functions executed on any props change, without any state.
Class component have a state, and may be rendered for state changes instead of props change only.
Also, in applications with many components, it’s very important to free up resources taken by the components when they are destroyed.
React provides hooks to handle all cases depending on the phase.
Let have an overview.
https://codesandbox.io/s/movoy4xr8p?module=%2FLifeCycle.js
A container component places our component as part of its content. It's being added to the DOM.
- constructor()
- componentWillMount()
- render()
- componentDidMount()
Our component calls
this.setState()to update its own state.
- shouldComponentUpdate(nextProps, nextState)
- componentWillUpdate(nextProps, nextState)
- render()
- componentDidUpdate(prevProps, prevState)
The container component in which our component was mounted makes a change on the provided props to our component.
- componentWillReceiveProps(nextProps)
- shouldComponentUpdate(nextProps, nextState)
- componentWillUpdate(nextProps, nextState)
- render()
- componentDidUpdate(prevProps, prevState)
There was an error during rendering, in a lifecycle method, or in the constructor of any child component.
- componentDidCatch()
constructor(props)Invoked before component is actually mounted.
The component's state is not defined yet.
this.propsandthis.stateare set yet.
It's a good place to set our default state.
Avoid introducing any side-effects or subscriptions in the constructor. For those use cases, use
componentDidMount()instead.
  constructor(props) {
    super(props);
    this.state = { mode: undefined } ;
}componentWillMount()Invoked immediately before mounting occurs (before first render, adding component to the DOM).
The
componentWillMount()is a chance for us to handle configuration, update our state, and in general prepare for the first render.
We can start performing calculations or processes based on the prop values.
componentWillMount() {
  const mode = this.props.age < 18 ? 'child' : 'adult';
  this.setState({mode})
}
This is the only lifecycle hook called on server rendering.
componentDidMount()Invoked immediately after a component is mounted. Right after first
render()(component just added to the DOM).
If you need to load data from a remote endpoint, this is a good place to instantiate the network request.
This method is a good place to set up any subscriptions. If you do that, don’t forget to unsubscribe in
componentWillUnmount().
componentDidMount() {
  this.intervalId = this.setInterval(this.update, 1000)
}
/*
componentWillUnmount() {
  this.intervalId && clearInterval(this.intervalId)
}*/componentWillReceiveProps(nextProps)Invoked before a mounted component receives new props.
If you need to update the state in response to prop changes (for example, to reset it), you may compare
this.propsandnextPropsand perform state transitions usingthis.setState()in this method.
componentWillReceiveProps(nextProps) {
  const mode = nextProps.age < 18 ? 'child' : 'adult';
  this.setState({mode})
}
Just because this method was called, doesn't mean the value of props has changed.
shouldComponentUpdate(nextProps, nextState)Invoked before rendering when new props or state are being received. Defaults to
true.
Used for optimization, to let React know if a component’s output is not affected by the current change in state or props.
shouldComponentUpdate(nextProps, nextState) {
  return this.state.mode !== nextState.mode
}
Returning false just stops ongoing updating phase
componentWillUpdate(nextProps, nextState)Invoked immediately before rendering when new props or state are being received.
Use this as an opportunity to perform preparation before an update occurs.
Note that you cannot call this.setState() here
componentWillUpdate(nextProps, nextState) {
  if (nextState.open == true && this.state.open == false) {
    this.props.onWillOpen();
  }
}componentDidUpdate(nextProps, nextState)Invoked immediately after updating occurs. This method is not called for the initial render.
Use this as an opportunity to operate on the DOM when DOM of the component has been updated.
componentWillUpdate(nextProps, nextState) {
  // only update chart if the data has changed
  if (prevProps.data !== this.props.data) {
    this.chart = c3.load({
      data: this.props.data
    });
  }
}componentWillUnmount()Invoked immediately before a component is unmounted and destroyed.
Perform any necessary cleanup in this method, such as invalidating timers, canceling network requests, or cleaning up any subscriptions that were created in componentDidMount().
/*
componentDidMount() {
  this.intervalId = this.setInterval(this.update, 1000)
}
*/
componentWillUnmount() {
  this.intervalId && clearInterval(this.intervalId)
}componentDidCatch(error, info)Error boundaries are React components that catch JavaScript errors anywhere in their child component tree.
A class component becomes an error boundary if it defines
componentDidCatchmethod.
componentDidCatch(error, info) {
  this.setState({ error, info });
}
/*
render() {
  if (this.state.error) {
    return <h1>Error: {this.state.error.toString()}</h1>;
  }
  return this.props.children;
}
*/There are several performance problems in
<TimeAgo>
- It's re-rendered every time
<TodoList>is updated.- It might cause memory leaks and errors, not clearing the
setInterval
Refactor <TimeAgo> using life cycle functions, fixing these issues.
https://codesandbox.io/s/6wv9rxlmk3?module=%2Fcomponents%2FTimeAgo.js
componentDidMount() {
  this.intervalId = setInterval(() => {
    this.setState({ now: Date.now() })
  }, REFRESH_TIME)
}

componentWillUnmout() {
  clearInterval(this.intervalId)
}

shouldComponentUpdate(nextProps, nextState) {
  return nextState.now !== this.state.now
}
https://codesandbox.io/s/2399w1289y?module=%2Fcomponents%2FTimeAgo.js
<TimeAgo>calculatestimestampon every render.
const timestamp = new Date(date).getTime()But, as it comes from a prop (date), it's the same value in each render.
Refactor <TimeAgo> to make sure timestamp is calculated only when needed.
https://codesandbox.io/s/2399w1289y?module=%2Fcomponents%2FTimeAgo.js
componentWillMount() {
  this.setState({
    now: Date.now(),
    timestamp: new Date(this.props.date).getTime()
  })
}
render() {
  const { date } = this.props
  const { now, timestamp } = this.state
  const diff = now - timestamp
  return prettyMs(diff, PRETTY_MS_OPTIONS)
}
https://codesandbox.io/s/zrnyxx683p?module=%2Fcomponents%2FTimeAgo.js
As your app grows, you can catch a lot of bugs with typechecking.
React has some built-in typechecking abilities.
To run typechecking on the props for a component, you can assign the special propTypes property.
import React from 'react'
import PropTypes from 'prop-types'

const Welcome = props => (
  <span>
    Welcome to JS Training,
    <strong> {props.userName.toUpperCase()}</strong>
  </span>
)

Welcome.propTypes = {
  userName: PropTypes.string
}
https://codesandbox.io/s/v034l8yvw7?module=%2Fcomponents%2FWelcome.js
PropTypesexports a range of validators that can be used to make sure the data you receive is valid.
import PropTypes from 'prop-types'

MyComponent.propTypes = {
  // You can declare that a prop is a specific JS type. By default, these
  // are all optional.
  optionalArray: PropTypes.array,
  optionalBool: PropTypes.bool,
  optionalFunc: PropTypes.func,
  optionalNumber: PropTypes.number,
  optionalObject: PropTypes.object,
  optionalString: PropTypes.string,
  optionalSymbol: PropTypes.symbol,

  // Anything that can be rendered: numbers, strings, elements or an array
  // (or fragment) containing these types.
  optionalNode: PropTypes.node,

  // A React element.
  optionalElement: PropTypes.element
}MyComponent.propTypes = {
// You can ensure that your prop is limited to specific values by treating
// it as an enum.
optionalEnum: PropTypes.oneOf(['News', 'Photos']),
// An object that could be one of many types
optionalUnion: PropTypes.oneOfType([
PropTypes.string,
PropTypes.number,
PropTypes.instanceOf(Message)
]),
// An array of a certain type
optionalArrayOf: PropTypes.arrayOf(PropTypes.number),
// An object with property values of a certain type
optionalObjectOf: PropTypes.objectOf(PropTypes.number)
}MyComponent.propTypes = {
// An object taking on a particular shape
optionalObjectWithShape: PropTypes.shape({
color: PropTypes.string,
fontSize: PropTypes.number
})
}You can chain any of the above with
isRequiredto make sure a warning is shown if the prop isn't provided.
MyComponent.propTypes = {
  // A value of any data type
  requiredAny: PropTypes.any.isRequired,

  requiredArray: PropTypes.array.isRequired,
  requiredBool: PropTypes.bool.isRequired,
  requiredFunc: PropTypes.func.isRequired,
  requiredNumber: PropTypes.number.isRequired,
  requiredObject: PropTypes.object.isRequired,
  requiredString: PropTypes.string.isRequired,
  requiredSymbol: PropTypes.symbol.isRequired,

  requiredNode: PropTypes.node.isRequired,

  requiredElement: PropTypes.element.isRequired
}MyComponent.propTypes = {
// You can also specify a custom validator. It should return an Error
// object if the validation fails. Don't `console.warn` or throw, as this
// won't work inside `oneOfType`.
customProp: function(props, propName, componentName) {
if (!/matchme/.test(props[propName])) {
return new Error(
'Invalid prop `' +
propName +
'` supplied to' +
' `' +
componentName +
'`. Validation failed.'
)
}
}
}Add propTypes properties to the following components:
-
<TodoItem>, all props required butdate.-
item.dateandonClickDeleteare optional. Make sure to apply conditional rendering, not showing the date or delete button.
-
-
<TimeAgo>, making sure thatdateis parsable by Date
https://codesandbox.io/s/zrnyxx683p?module=%2Fcomponents%2FTodoItem.js
TimeAgo.propTypes = {
  date: function(props, propName, componentName) {
    const date = props[propName]
    if (!Date.parse(date)) {
      const msg = `Invalid prop '${propName}' supplied to ${componentName}. Not a parsable date.`
      return new Error(msg)
    }
  }
}
https://codesandbox.io/s/mm9pj5350j?module=%2Fcomponents%2FTimeAgo.js
defaultPropscan be defined as a property on the component class itself, to set the default props for the class.
This is used for undefined props, but not for null props.
class CustomButton extends React.Component {
  // ...
}

CustomButton.defaultProps = {
  color: 'blue'
}
If props.color is not provided, it will be set by default to 'blue'
In the typical React dataflow, props are the only way that parent components interact with their children.
Sometimes a component may need to directily access its children's DOM elements:
- Managing focus, text selection, or media playback.
- Triggering imperative animations.
- Integrating with third-party DOM libraries.
function CustomTextInput(props) {
  // textInput must be declared here so the ref callback can refer to it
  let textInput = null

  function handleClick() {
    textInput.focus()
  }

  return (
    <div>
      <input
        type="text"
        ref={input => {
          textInput = input
        }}
      />
      <input type="button" value="Focus the text input" onClick={handleClick} />
    </div>
  )
}Refs are only available after first render.
It means that in class components, they're available starting on
componentDidMount()
Improve <TodoForm> to have a reference of the input, instead of dansgerously accessing e.target[0]
You might have top convert it into a class component.
https://codesandbox.io/s/mm9pj5350j?module=%2Fcomponents%2FTodoForm.js
class TodoForm extends React.Component {
  onSubmit(e) {
    e.preventDefault()
    this.props.onNew(this.textInput.value)
    this.textInput.value = ''
  }

  render() {
    const { placeholder } = this.props
    return (
      <form className="todo-form" onSubmit={this.onSubmit.bind(this)}>
        <input
          ref={input => (this.textInput = input)}
          className="new-todo"
          name="todo"
          placeholder={placeholder}
        />
      </form>
    )
  }
}
https://codesandbox.io/s/7579260oq?module=%2Fcomponents%2FTodoForm.js